Showing posts with label breakfast. Show all posts

Wednesday, April 13, 2011

Cheese Blintzes with Blueberry Compote


When I found myself with a partially used container of ricotta cheese languishing in the fridge, I decided I wanted to bake something.  Anything.  Well, anything sweet really, since I wasn't in the mood for stuffed shells or lasagna or other such things.  It was with this in mind that I found myself browsing through the first cookbook anyone had ever gotten me, The King Arthur Flour Baker's Companion.


I received this cookbook as a Christmas gift from one of my brothers while I was in college.  I don't recall having as pronounced an interest in cookbooks, recipes, and cooking then as I do now, but it is safe to say that this book was probably the catalyst that sparked my current interest.  It was unlike any other cookbook we as a household owned (and by we I mean Mom).  Mom had a few of your typical cookbooks such as Better Homes and Garden's New Cookbook (the link is for a newer version) as well as some not so typical like the Le Leche League's Whole Foods for the Whole Family (which I'd still like a copy of and again, I think that link is for an updated version).  There were a scattering of other cookbooks and magazines of cookie recipes and such, but this book was strictly for baking.


Growing up there wasn't a lot of baking happening in our house.  Mom was, and still is, an incredible cook.  She was able to seemingly instinctively throw together ingredients, sometimes with random leftovers, and create a delicious meal.  Baking, however, didn't happen except during predictable times such as pies for Thanksgiving and cookies for Christmas.  I think that having eight kids to corral kept Mom understandably otherwise occupied.  Which is why a book devoted to baking held such an allure.


I have read through the book cover to cover at at least once.  I like that it has short captions, suggestions, and interesting tidbits of information scattered throughout the recipes.  If it were up to me, there would be a lot more pictures of the final products included but we can't have everything.  This time, while I was flipping through it with intent, I came across this recipe for Cheese Blintzes with Blueberry Compote and even without an accompanying picture I knew it would be the perfect way to use up my neglected ricotta.


The filling recipe had to be modified a bit to cater to how much ricotta I had left and I cut the sugar for the compote in half (why does everything have to be so sweet?) as well as altering the cooking method a bit.  The results were absolutley delicious.  The tang of the blueberries were offset nicely by the delicate crepes and the smooth creamy filling.  I am sure that this would grace a breakfast buffet just as easily as a dessert table.  We ended up eating it as breakfast for dinner and were perfectly content.


Cheese Blintzes with Blueberry Compote
Crepes:
1 3/4 cup milk
3 eggs
5 Tablespoons melted butter or oil
1/2 teaspoon salt
1 1/2 cups flour
1/2 tsp. cinnamon, nutmeg, allspice, or vanillla (optional)

To your blender add all the ingredients and pulse until very smooth.  Allow the batter to rest in the fridge for about an hour.  This allows the gluten to relax (I often skip this step because I'm impatient).

Preheat a lightly greased nonstick crepe or omelet pan over medium high heat.  The amount of batter you will need for each one will be determined by how large your pan is, for an 8 inch pan use about 1/4 cup of batter.  Tip and tilt the pan in a swirl to allow the batter to spread into a thin coating on the surface of the pan.  Cook the pan until it has set and no longer looks wet.  Remove the crepe to a plate to cool and start the next one.

You may stack the crepes as long as you stack them with the "uncooked" side all facing the same direction so that they don't stick together.    These can be topped with a sprinkle of cinnamon and sugar, sliced fruit, Nutella, etc. if you don't want to make blintzes.

Creamy Ricotta Filling:
6 oz cream Cheese, softened
1/4 tsp salt
1 Tablespoon Sugar
1 egg yolk (I added the white to the crepes)
1 tsp vanilla
1 cup Ricotta

In a medium bowl, beat the cream cheese, salt and sugar together until well combined.  Add the remaining ingredients and mix until well combined.

Blueberry Compote:
1/4 cup cold water
1 tablespoon cornstarch
1 tablespoon sugar
1 teaspoon lemon juice
pinch salt
2 cups blueberries (fresh or frozen)

Combine water and cornstarch in a medium saucepan.  Add remaining ingredients and stir to combined.  Heat over a medium flame until the mixture is starting to bubble and slightly thicken.  Cool to lukewarm.


Blintz Assembly:
Place about 2 tablespoons of filling in the center of each crepe.  Fold the sides in, the top down, and then roll the crepe to enclose the filling.  Place them all in a lightly greased pan and bake them in a preheated 350°F oven for about half an hour or until they are heated through.  Serve them hot topped with the blueberry compote.

Tuesday, December 14, 2010

Making Eggs Benedict with the Daring Cooks


Jenn and Jill have challenged The Daring Cooks to learn to perfect the technique of poaching an egg. They chose Eggs Benedict recipe from Alton Brown, Oeufs en Meurette from Cooking with Wine by Anne Willan, and Homemade Sundried Tomato & Pine Nut Seitan Sausages (poached) courtesy of Trudy of Veggie num num.


When this month's challenge was announced I read through the introduction to the recipes and did a quick scan over the ingredients list.  What I realized when I did so was that I had nearly all of the required ingredients on hand at the moment.  Not only did I have the necessary ingredients but since I waited until the last minute to make my souffles last month, I still had the yolks sitting in the fridge waiting to be used.  Perfect!  I made a quick substitution of regular bacon for the Canadian bacon and started whipping up a batch of English Muffins since they were the only thing I was missing.  I made these within days of the announcement so it makes total sense that I am posting it at the last minute, right?  No procrastination happening over here.


I can't even begin to describe how incredible these were.  I would love to say that I will be making these often but the two sticks of butter in the sauce kind of put a halt on that thinking.  And it is a good thing that whisking the butter into the yolks was kind of time consuming (anyone else with a sore shoulder the next day?) because otherwise these would be all to easy to indulge in more often than I should.  That's not to say that I won't make these again because, wow, they were so awesome.  I wanted to eat the sauce with a spoon and probably would have if Hey, Babe wouldn't have made fun of me.  I it the same as the challenge recipe except I added a little onion powder and mustard powder to the sauce and then I topped mine with some chopped dill.  I'm actually kind of sad remembering these because they are all gone now.


From what I understand the sauce isn't supposed to keep well but since we had leftover sauce I decided to see what would happen to it the next day.  I found that if you reheat it very gently and slowly over a double boiler while stirring, it was usable but not quite as pretty as the day before.  It didn't bother me though, and I had it over a piece of toast and a fried egg the next day.  I miss this sauce.  What I would like to know is why no one ever told me how incredible Eggs Benedict taste. 


The English Muffins were also great, and relatively easy to make.  I used this recipe from Brown Eyed Baker, originally from The Bread Baker's Apprentice by Peter Reinhardt.

Monday, November 15, 2010

Date Nut Bread


Recently I was in a discussion about good holiday breads and what varieties to make.  I suggested Date Nut Bread, which I have always liked especially when it is cold and smeared with cream cheese.  When I was asked for a recipe I realized that I have never actually made my own.  Up until now someone else has always supplied it.


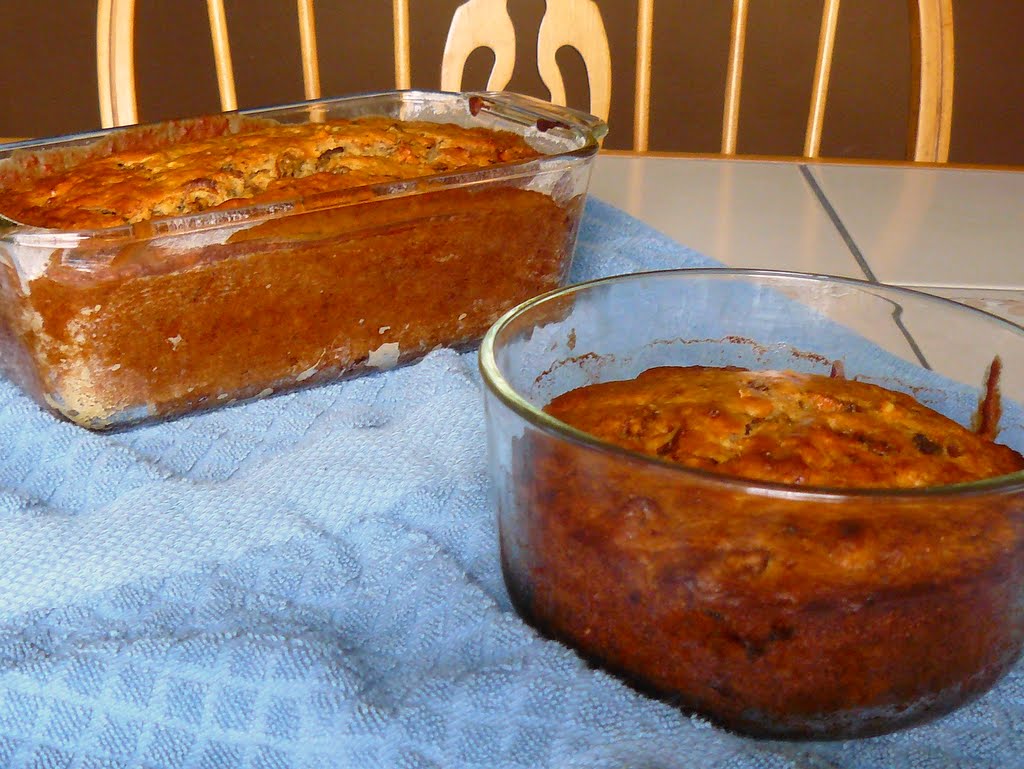
I knew that I had a few recipes in my collection as well as some dates in the pantry.  After perusing the ingredient list and realizing that I had all of the necessary parts, I decided that it was the perfect thing to make while stuck inside on a drizzly day with a head cold.  It was also nice and simple and so Little Man would be able to help.  A perfect distraction to cheer up Little Man, who was disappointed that due to the head cold his cousins couldn't come over to play.  Furthermore, this was the perfect recipe to use and then realize that my loaf pans are not 9 x 5 inches, but seem to instead be 8 1/2 x 4 1/2 inches.  Which is why I found myself suddenly needing to make a smaller round loaf as well.


Most Date Nut Breads that I have tried have been dense, and a perhaps a tiny bit dry (this may be why I like them with cream cheese).  The dates are usually a bit on the chewy side as well.  The bread that I was expecting to come out of my oven never appeared.  This Date Nut Bread is moist, soft, and fluffy.  Because the dates are soaked in hot water and baking soda beforehand, they practically melt in your mouth when you take a bite.  No chewy, papery skins to contend with.


I can't say for certain whether or not this will be as good with cream cheese, as that was the one ingredient I seem to be out of.  I can say that it does look promising.  The cream cheese would add slightly tangy, salty notes that I feel would complement the nutty sweetness of the bread.  I'm not sure that we will be able to find out with this batch how well the two might go together.  This date nut bread is too good on its own to last long enough for me to get some cream cheese to try it with.

Date Nut Bread
Ingredients
1 cup boiling water
1 teaspoon baking soda
2 cups chopped dates (grease your knife if you don't want the dates to stick to it)
2 cups all-purpose flour
1 teaspoon baking powder
1/2 teaspoon table salt
1/2 cup packed brown sugar
2/3 cup buttermilk
6 tablespoons unsalted butter (3/4 stick), melted and cooled
1 large egg
1 cup walnuts, toasted and chopped coarse

Instructions
1. Preheat the oven to 350°F. Grease and flour a 9 by 5-inch loaf pan.

2. Mix the boiling water, baking soda, and dates together in a medium bowl. Cover and set aside until the dates have softened and the water is lukewarm, about 30 minutes.

3. In a large bowl, mix together the flour, baking powder, salt and nuts.  In a separate bow, stir together the brown sugar, buttermilk, melted butter, and egg until combined. Add the date mixture to the wet ingredients, stirring until combined. Gently stir the buttermilk mixture into the flour mixture with a spatula until just combined.

4. Scrape the batter into the prepared pan and smooth the surface. Bake until dark brown and a toothpick inserted into the center comes out with just a few crumbs attached, 45 to 55 minutes.  Cool loaf in pan 10 minutes before removing to rack to finish cooling, about 1 hour.

Thursday, November 11, 2010

Corncake Pancakes


Pancakes are one of those versatile foods that you can make or top any number of ways and they will always satisfy.  They can be wholesome or decadent, light or filling.  Have them for breakfast, brunch, snack, or dinner and I will be a happy camper, have them camping even!  While I was growing up, when Mom made pancakes it was always with a humongous bowl full of batter.  She would mix it up and grab a platter to flip them on and then get ready to stand at the stove for a while.  One of us kids or my Dad would be on butter duty.  Our job then was to stand at her side with a stick of butter, sliding it over each pancake as she flipped it off of one of the griddles.  Yes, one of them.  Having nearly a dozen people to wait in line for pancakes, my wise mother invested in a second griddle so that she could be flipping eight pancakes off at a time.  I don't have nearly as many people waiting for pancakes when I make them, but I still have two griddles myself since it means the job gets done in half the time and I can actually eat with my family.


We would eat them as they were ready.  As soon as a few more were cooked and buttered they were snatched away and covered in syrup or cinnamon sugar, or very occasionally, jelly.  This meant that we weren't actually all sitting down together to eat, instead we were all in various stages of our individual meals.  That didn't matter to any of us, except for perhaps Mom, who was usually waiting until the last of the batter was cooked before eating her own.


I believe Mom always used the exact same recipe for her pancakes.  I find it funny now that I realize this, but I don't actually have that recipe (mental note: get it).  My recipe obsession has led me to try recipes with all kinds of variations: change the grain (whole wheat, white, corn, oat, wheat germ), change the dairy (sour milk, fresh milk, sour cream, yogurt, buttermilk), change the grease (corn oil, olive oil, melted butter), add something in (bananas, apples, chocolate chips, berries).  I like them all.  It is comforting to know that no matter how much you change the pancake recipe, either by design or circumstance pancakes are still good.  I think, however, that these might be my new favorite.  I love texture and flavor that the cornmeal adds.  These were awesome.  They will definitely be making an appearance Thanksgiving morning when we carry on Hey, Babe's family tradition of making teddy bear shaped pancakes and decorating them with M&Ms.  This means I'll be using the same recipe twice in one month, these must have been good.

Corncake Pancakes
Ingredients
1 1/2 cups all-purpose flour
1/2 cup cornmeal
1 teaspoon baking powder
1/2 teaspoon baking soda
1/2 teaspoon salt
2 eggs
1/4 cup granulated sugar
1 cup milk
3/4 cup buttermilk (or yogurt)
1/3 cup butter melted (or oil)

Instructions
Combine flour, cornmeal, baking powder, baking soda and salt in a medium bowl.

In another medium bowl, mix eggs and sugar together, stirring for about 30-60 seconds.  Add the milk, buttermilk and melted butter; mix well.

Mix the dry ingredients into the wet ingredients with the mixer until smooth. Let the batter sit for 10 minutes.

Spray a hot griddle with nonstick spray. Spoon 1/4 cup portions of the batter onto the hot griddle and cook for 2 to 3 minutes per side until brown. Serve hot with butter and maple syrup or apple butter, or jam, or cinnamon and sugar, etc.

Thursday, October 28, 2010

Breakfast Burritos


While I was talking on the phone with Mom yesterday she mentioned that she was thinking of making some sort of freezable breakfast sandwich so that my siblings who all need to be out the door early would be able to grab an easy, full, hot meal beforehand.  There is always the option of buying such a sandwich, but then you risk buying something loaded with chemicals, preservatives, way too much sodium, lesser quality ingredients, etc. and paying a premium for it.  It just so happens that I made these delicious burritos earlier this week.  I hadn't intended on posting them right away, there are other recipes in line ahead of them, but since Mom is looking for a recipe like this they get to jump the line.


Honestly, this is such a simple thing to make.  Most people who swear that they can't cook are still able to scramble themselves an egg and heat up some breakfast meat to go with it.  That pretty much sums up the recipe.  Well, I suppose it is a bit more complicated than that, but not by a heck of a lot.  What I liked about this recipe was that it is very versatile, you can swap around each of the components to cater to your preference or to just change it up so that they don't get boring.  What Hey, Babe liked about these was that they tasted soo good he felt like he was making a meal out of snack food.  I think that's supposed to be a good thing.  I think that they are better with the tortilla a little bit crispy, it almost tastes like a buttery pastry crust once they crisp up.


These are actually supposed to be Freezer Breakfast Burritos, and I have two of them sitting in my freezer now.  I can't vouch for them just yet, we are planning on eating them as a quick breakfast before we do our monthly grocery trip really early on Sunday morning.  Once we've tried them I'll head back here and update to let you know how it works out.


Breakfast Burritos
Ingredients
1 tablespoon Butter
1/2 lb. favorite breakfast meat: bacon, pork roll, ham, Canadian bacon, sausage etc. (I used bacon)
Favorite Veggies:  diced peppers, diced onions, sliced mushrooms, broccoli, etc. (I used peppers and onions)
6 eggs
2 tablespoons milk
Salt and Pepper to taste
1/4 cup chunky salsa
1 cups Favorite Cheese: Cheddar, Pepper Jack, Colby, American, etc. (I used Cheddar)
12 10"whole wheat flour tortillas


Instructions
In large skillet, melt 1 tablespoon of butter and add your choice of breakfast meat, cooking until completely done.  Carefully remove only the meat (not the oil) to cutting board and chop into bite sized pieces.


Adjust the levels of grease in the pan, if there is not enough add some butter/oil, if there is too much drain a little off.  To the hot pan add your choice of vegetables.  Or not.  Some people don't like vegetables in their eggs (or really ever), so that is totally up to you.  I like my onions well cooked, so I added them right away and cooked them til they were nice and softened.  However, I do not like mushy peppers, so I didn't add them at all here.  Mushrooms would need to be added now also.  Cook your assortment of veggies until they are done to your specifications.  Remove cooked veggies from pan to a plate.  Or don't.  If you leave them in they won't be as pretty, but you won't dirty another dish.  (I left mine in.)


In a large bowl, beat eggs and milk together, adding salt and pepper to taste.  Add eggs to hot pan (again, adjusting oil first), stirring frequently until scrambled and set. Add cooked meat, veggies, and salsa to egg mixture.

Warm tortillas as directed on package.  You want them soft enough so that they don't tear when you are rolling them up. Place about 1/2 cup egg mixture onto each tortilla (just divided up the pan into even portions equal to how many tortillas I had) and sprinkle with some cheese.  Fold in the ends of each tortilla and roll up, making burritos.


At this point you can go one of two ways.  You can place them all on parchment paper lined cookie sheets and freeze until solid. Then wrap individually and package in zip-lock freezer bags.  Or you can put them all in a baking pan and bake them at 350°F for 10-15 minutes until hot.  I did both.


When you're ready to eat the frozen ones, unwrap the burritos, wrap loosely in microwave safe paper towel and heat in the microwave on high power for 1-3 minutes until hot and cheese is melted.  Or for those of us who do not use microwaves (me) you can also thaw burritos in the refrigerator overnight and either place them in a baking dish or wrap them individually in foil and bake.  Apparently, the thawed burritos can also be deep fried for 3-5 minutes until golden brown and crisp.  It sounds good but I don't usually deep fry things so I probably won't try it.  Let me know if you do.

edited to update:
We've tried the ones that I froze and they were excellent!  I prefer the burrito to get a little crisp, so next time I won't bother with defrosting it before I put it in the toaster oven (unwrapped so it gets crispy!) for about 15-20 minutes, by then the insides will have defrosted and heated up.  I plan on making a huge batch of these to freeze this weekend.

Saturday, October 9, 2010

Italian Sausage Bread

I had never heard of Italian Sausage Bread before I happened across it on Food Blogga's site.  And the title didn't actually clarify it for me much, as I thought it would be just sausage cooked into bread, but it is much, much more.  Take your basic pizza dough and fill it with not just sausage, but pepperoni, egg, Parmesan, Mozzarella and Parsley.  It is like a great Omelet all cooked up into an easy to handle package.  Definitely more than just bread and sausage.


While you can use any version of your favorite pizza dough, or even use store bought dough, I decided to try the pizza dough recipe that the Daring bakers used a while back, why not kill two recipes with one dinner? (That's how the saying goes...right?)  It was fabulous for this.  For some reason in the final product the pizza dough ended up tasting buttery and almost pastry-like, even though there was no butter in the entire recipe.  I will definitely be using the same crust the next time I make this, and I will definitely be making it again. 


It seems like this would be a great thing to assemble Christmas Eve and then partially bake, finishing it up the next morning for an easy to make breakfast amid all the present opening chaos.  I am also curious how they would be assembled in miniature and then frozen in individual serving sizes.  Or how it would be with bacon, or ham, or fried onions or...I could go on.  There are so many possibilities with this recipe, and I think will have to try them all.  Hey, Babe and Little Man liked it, so I'm sure that they won't mind having another version of it in the future. 


I halved the recipe since there was only the three of us, big mistake.  I'm definitely going full size next time.  Even if there are leftovers, I hear they are supposed to be good toasted the next day.


Italian Sausage Bread
Ingredients
1 pound pizza dough, at room temperature
2 teaspoons olive oil
1 pound mild Italian sausage removed from the casing
1/2 cup pepperoni slices, quartered
6 large eggs lightly beaten, seasoned with salt and pepper
1-2 cups shredded mozzarella (about 1/2 pound)
1/2 cup grated Parmesan cheese
1 cup finely chopped fresh flat leaf parsley
Instructions1. Pre-heat oven to 425°F. Roll out room temperature dough into a rectangle about 10 X 12 inches on a very well floured counter. Cover while cooking the filling.

2. In a large heated pan, cook the sausage over medium high until well browned and crispy, about 8-10 minutes.  While it is cooking use a potato masher (or whatever is available, I found the potato masher worked best) to break up the sausage into small pieces. Add pepperoni and continue cooking another 2-3 minutes. Add the remaining ingredients and cook, stirring often until the eggs are partially cooked and the cheese is starting to get melted and stringy.  Don't over cook the mixture, it is going to finish cooking in the oven.  You just want it to cooked enough to hold together for the assembly process.  Remove the mixture onto a plate to cool for 5 to 7 minutes.

3. Spread egg mixture on dough, leaving a 1-inch border all around. Fold the shorter sides of the dough over the filling so that when you roll it up nothing oozes out. Then, starting at an unfolded, longer sides, roll the dough up over the filling into a jelly roll type of loaf. Place the roll on a floured or parchment lined baking sheet in the middle of the pan with the seam side down.  Brush the top of the loaf with olive oil.

4. Bake for 20-25 minutes or until golden brown and crisp. Cool slightly before serving. Eat hot or at room temperature.  Hey, Babe and Little Man liked it with ketchup and I liked it plain. 

I should have made more.

Thursday, October 7, 2010

Pumpkin...Bread?


I am never entirely convinced that fruit and veggie "breads" are really in the right category.  They are usually to tender, to sweet, and to cake-like for me to feel right in calling them a bread.  This pumpkin bread is no exception, but that is okay because it is absolutely delicious.  I adapted it from Dorie Greenspan's pumpkin muffin recipe from her book Baking: From My Home To Yours. Now there is a clear category, not a cupcake or a biscuit but a muffin.  It tells you exactly what to expect.  But that is besides the point.

I had a large amount of fresh pumpkin puree on my hands and an itch to bake something to fill the house with warmth and spices.  So I turned to Dorie's book, which I had acquired after I stumbled upon the Tuesdays With Dorie group.  There were so many recipes I was interested in that I finally requested a copy of my own.  Unfortunately, I have not used it much since it was given to me for my birthday, but since the recipes I have used from it have all been wonderful it was time to pull it off the shelf.

As is my habit, I started changing things right away.  I hate to wash dishes by hand if I can avoid it (although usually Hey, Babe is the one who does it for me), so muffins were out.  So were the raisins, blarg! which should almost never be cooked as far as I am concerned.  The Storm Sprite was asleep now so waiting for butter to soften was out, sub in some oil instead.  And lastly, since I was using homemade pumpkin puree and it was a bit thinner than the canned stuff, I swapped out the buttermilk (which I didn't have anyway) for some sour cream, reasoning that it was thicker and might help balance the extra moisture from the pumpkin.  (With all the changes I make to every recipe I ever come across, can I really say that I like someone's recipe?  Or do I just like my adaptations of it?  I don't think I'll ever know.)

It was delicious.  Tender, moist, slightly sweet, and with a nice crunch from the walnuts.  The warmth from the spices were just right for fall.  I still have a hard time calling it a bread instead of a cake or something.  It doesn't help that I baked it in a baking dish instead of a bread pan.  I wasn't sure that it would turn out right if there wasn't enough surface area for the moisture to evaporate, so I opted for my 7" x 11" pyrex dish.  It is kind of an odd size, but I got it with a set and I use it more than I thought I would.  If I didn't have it, I would have probably just split the batter between two bread pans.  Next time, to circumvent the whole cake/bread problem, I think I will throw on a streusel topping with some brown sugar and chopped walnuts and just call it a coffee cake, problem solved.

Pumpkin Bread, Cake, Whatever
Ingredients
2 cups all-purpose flour
2 teaspoons baking powder
1/2 teaspoon baking soda
1/4 teaspoon salt
1 teaspoon ground cinnamon
1/2 teaspoon ground ginger
1/8 teaspoon ground nutmeg
 Pinch of ground allspice
1/2 cup oil
1/2 cup granulated sugar
1/4 cup packed light brown sugar
2 large eggs
1 teaspoon vanilla extract
1 cup fresh pumpkin puree
1/4 cup sour cream
1/2 cup chopped walnuts

Instructions
Put oven rack in middle position  and preheat oven to 350°F.  Lightly grease a 7" x 11" baking dish (or two regular sized bread pans).  Set aside.

While oven is preheating, mix together all the dry ingredients from the flour through the allspice.  In a separate bowl, combine the two sugars and the oil until well mixed.  Add the eggs one at a time, mixing well after each.  Stir in the vanilla, pumpkin and sour cream.  

Add the dry ingredients to the wet ingredients and stir until they are just combined.  Add the walnuts and stir just until they are evenly distributed.  Pour the batter into the prepared pan(s) and place in the preheated oven for 25-30 minutes (mine took 30) or until a toothpick inserted in the center comes out clean.  Set pan on a rack and cool 5 minutes before loosening the cake/bread from the sides of the pan.  Let finish cooling completely. 
Related Posts Plugin for WordPress, Blogger...