Showing posts with label dessert. Show all posts

Wednesday, April 27, 2011

Daring Bakers Make Mousse in an Edible Container

The April 2011 Daring Bakers’ challenge was hosted by Evelyne of the blog Cheap Ethnic Eatz. Evelyne chose to challenge everyone to make a maple mousse in an edible container. Prizes are being awarded to the most creative edible container and filling, so vote on your favorite from April 27th to May 27th at http://thedaringkitchen.com!


So, can I tell you a secret?  I'm not writing this at the last minute.  It always seems that real life craziness gets in the way of my ability to complete the Daring Challenges until the very last minute (like the day it is due to be posted) and then I find myself up late after the kids are in bed trying to get the post finished.  Not this time!  I have more than a week to go before this post will publish.  It feels kind of...strange actually.  But I think I like it.


When I first read this challenge, I only skimmed over it assuming that it was the same as the Daring Cooks edible container challenge, except sweet instead of savory.  I missed one key detail in reading the instructions where it said, "There are 2 mandatory components to this challenge. You must make one of the 2 maple mousse recipes listed below and you must make an edible container in which to place your mousse for presentation."  They even put them in bold.  Somehow I thought I could make any filling and it wasn't until the other day that I realized I was suppose to make a maple mousse.


When I realized the filling had already been selected for me I didn't really mind, but I wasn't able to get back to the store to get the real maple syrup that was required.  Not seeing any time in the near future that would be convenient to pick some up and wanting to get started filling the bowls I had already made, I decided to go with Honey, which had been presented as an alternative.  The dried pineapple bowls were inspired by the dried pineapple flowers on Martha Stewart's site, which I saw quite some time ago.  Her recipe says you only need to dry them for around an hour which I found not nearly sufficient.  Perhaps if you can manage to get your pineapple slices paper thin that will be fine, otherwise expect to check it every half hour or so until it is nice and dry and tacky. 


I'm wondering if it would have helped to dried them flat for the first half hour or so before trying to flip them over and place them in my silicone muffin cups.  Trying to fit the stiff, fresh pieces of pineapple was a little tricky because they wanted to tear and break but I noticed when I was checking on them that they had become much more pliable after a little time in the oven.  Be sure that you dry your pineapple on some parchment paper, or a silpat, or something else that it won't stick to otherwise you will end up rather aggravated later.  The muffin cups I used were a gift from one of my brothers (hmm, I seem to get a lot of cooking paraphernalia from those guys) and I don't get to use them often but they worked marvelously for this.  I might make some individual sized fruit leathers in them soon.


Here I am rambling on and I haven't yet told you how wonderful the pineapple and honey went together!  The mousse on it's own was incredibly sweet and I can't really see myself eating much of it that way.  After I paired it with the dried pineapple I was surprised how much less sweet it seemed.  Even though pineapples are a sweet fruit the acidity from the citrus really seemed to mute the sweetness of the mousse.  The pineapple cups were a little chewy and I loved that next to the melting smoothness of the mousse. 


Don't forget that this month's challenge is a competition!  Browse around and see what some other creative souls from the Daring Bakers have come up with and make sure that you vote for your favorite from April 27th to May 27th at http://thedaringkitchen.com!  And if you'd like to try it, find the challenge recipe here!

Saturday, April 23, 2011

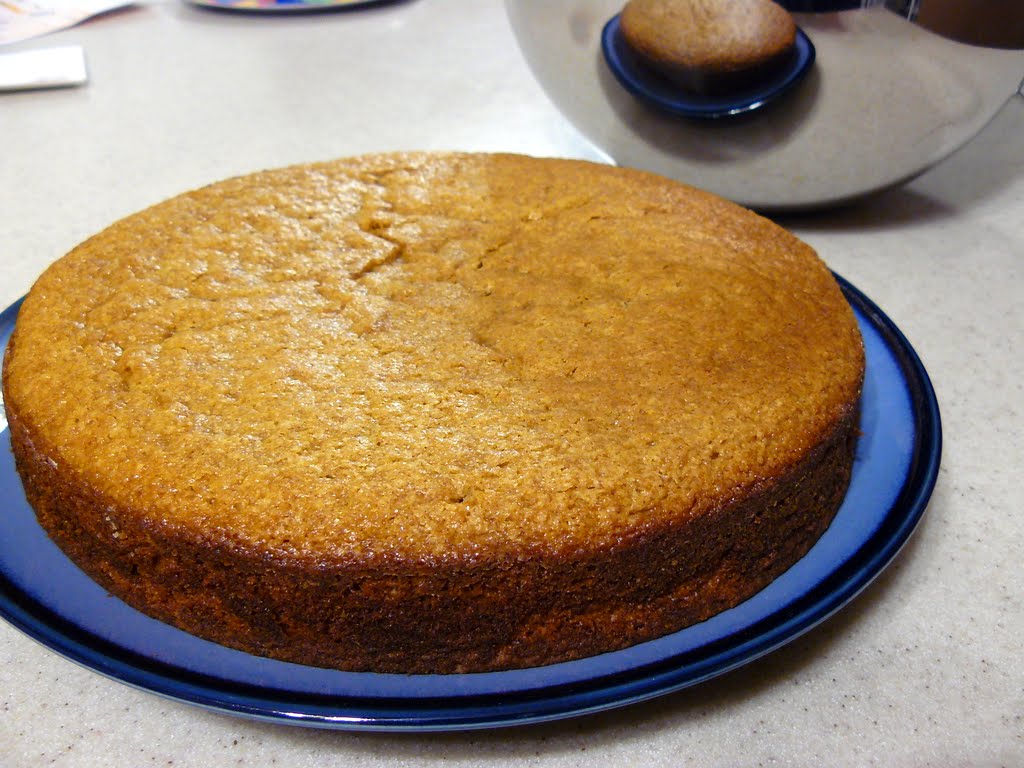
Coffee Cake (not Coffeecake) With Chocolate Icing


For Hey, Babe's birthday we were planning on having a party with his family that, due to various illnesses that bounced between households, never actually happened.  Because of that, I am really glad that I decided last minute on his actual birthday to whip together a cake for an intimate family celebration after dinner.  Plus, even though Hey, Babe isn't a dessert person I know that Little Man was looking forward to singing to Daddy and eating some CAKE!


When I was scanning through some recipes I knew I didn't have a lot of time, which meant that the recipe had to be very simple.  It also couldn't be a chocolate or a vanilla cake since I already had two layers of chocolate cake in the freezer for the coming weekend party and he doesn't care for vanilla.  After flipping through some books I decided to Frankenstein a few recipes and came up with this one.  I  used the recipe for Boiled Milk Frosting that you can find here, choosing to make the chocolate version (add 1/4 cup cocoa powder) that was given as an alternate option.


The cake came together quickly and easily.  It was a very tasty cake, and had it not been for the added icing it would have been a very simple, every day sort of snack cake.  It isn't often that I have a coffee flavored cake and for that reason alone I'd have made it again, but for a cake that was cobbled together from several recipes (mostly Dorie Greenspans Cinnamon Squares) I was quite pleased with how it turned out.

Quick Coffee Cake
Ingredients
1 3/4 cups Flour
1 cup Sugar
2 teaspoons Baking Powder
1/4 teaspoon Salt
3/4 cup Whole Milk
1 tablespoon Instant Coffee Granules
2 Eggs
1/2 teaspoon Vanilla Extract
10 tablespoons Butter, melted and cooled
1 recipe Boiled Milk Frosting (your choice of flavor) optional

Instructions
Preheat the oven to 350°F and grease and flour either an 8-inch square or 9-inch round cake pan.

In a large bowl combine the flour, sugar, baking powder, and salt.  In a large Pyrex measuring cup measure out 3/4 cup of milk and add 1 tablespoon (or more if you'd like it a bit stronger flavored) of coffee granules.  Stir to dissolve.  Whisk in the eggs and vanilla.

Working quickly but gently, stir the wet ingredients into the dry ingredients just until they are combined.  Use a spatula to carefully fold in the cooled melted butter until you have a smooth batter.

Pour batter into prepared pan and bake 35 minutes or so until a knife or toothpick inserted in the center comes out clean.  Allow to cool at least 10-15 minutes before removing from pan.  If you plan on icing it be sure to cool the cake completely first.  Enjoy!

Wednesday, April 13, 2011

Cheese Blintzes with Blueberry Compote


When I found myself with a partially used container of ricotta cheese languishing in the fridge, I decided I wanted to bake something.  Anything.  Well, anything sweet really, since I wasn't in the mood for stuffed shells or lasagna or other such things.  It was with this in mind that I found myself browsing through the first cookbook anyone had ever gotten me, The King Arthur Flour Baker's Companion.


I received this cookbook as a Christmas gift from one of my brothers while I was in college.  I don't recall having as pronounced an interest in cookbooks, recipes, and cooking then as I do now, but it is safe to say that this book was probably the catalyst that sparked my current interest.  It was unlike any other cookbook we as a household owned (and by we I mean Mom).  Mom had a few of your typical cookbooks such as Better Homes and Garden's New Cookbook (the link is for a newer version) as well as some not so typical like the Le Leche League's Whole Foods for the Whole Family (which I'd still like a copy of and again, I think that link is for an updated version).  There were a scattering of other cookbooks and magazines of cookie recipes and such, but this book was strictly for baking.


Growing up there wasn't a lot of baking happening in our house.  Mom was, and still is, an incredible cook.  She was able to seemingly instinctively throw together ingredients, sometimes with random leftovers, and create a delicious meal.  Baking, however, didn't happen except during predictable times such as pies for Thanksgiving and cookies for Christmas.  I think that having eight kids to corral kept Mom understandably otherwise occupied.  Which is why a book devoted to baking held such an allure.


I have read through the book cover to cover at at least once.  I like that it has short captions, suggestions, and interesting tidbits of information scattered throughout the recipes.  If it were up to me, there would be a lot more pictures of the final products included but we can't have everything.  This time, while I was flipping through it with intent, I came across this recipe for Cheese Blintzes with Blueberry Compote and even without an accompanying picture I knew it would be the perfect way to use up my neglected ricotta.


The filling recipe had to be modified a bit to cater to how much ricotta I had left and I cut the sugar for the compote in half (why does everything have to be so sweet?) as well as altering the cooking method a bit.  The results were absolutley delicious.  The tang of the blueberries were offset nicely by the delicate crepes and the smooth creamy filling.  I am sure that this would grace a breakfast buffet just as easily as a dessert table.  We ended up eating it as breakfast for dinner and were perfectly content.


Cheese Blintzes with Blueberry Compote
Crepes:
1 3/4 cup milk
3 eggs
5 Tablespoons melted butter or oil
1/2 teaspoon salt
1 1/2 cups flour
1/2 tsp. cinnamon, nutmeg, allspice, or vanillla (optional)

To your blender add all the ingredients and pulse until very smooth.  Allow the batter to rest in the fridge for about an hour.  This allows the gluten to relax (I often skip this step because I'm impatient).

Preheat a lightly greased nonstick crepe or omelet pan over medium high heat.  The amount of batter you will need for each one will be determined by how large your pan is, for an 8 inch pan use about 1/4 cup of batter.  Tip and tilt the pan in a swirl to allow the batter to spread into a thin coating on the surface of the pan.  Cook the pan until it has set and no longer looks wet.  Remove the crepe to a plate to cool and start the next one.

You may stack the crepes as long as you stack them with the "uncooked" side all facing the same direction so that they don't stick together.    These can be topped with a sprinkle of cinnamon and sugar, sliced fruit, Nutella, etc. if you don't want to make blintzes.

Creamy Ricotta Filling:
6 oz cream Cheese, softened
1/4 tsp salt
1 Tablespoon Sugar
1 egg yolk (I added the white to the crepes)
1 tsp vanilla
1 cup Ricotta

In a medium bowl, beat the cream cheese, salt and sugar together until well combined.  Add the remaining ingredients and mix until well combined.

Blueberry Compote:
1/4 cup cold water
1 tablespoon cornstarch
1 tablespoon sugar
1 teaspoon lemon juice
pinch salt
2 cups blueberries (fresh or frozen)

Combine water and cornstarch in a medium saucepan.  Add remaining ingredients and stir to combined.  Heat over a medium flame until the mixture is starting to bubble and slightly thicken.  Cool to lukewarm.


Blintz Assembly:
Place about 2 tablespoons of filling in the center of each crepe.  Fold the sides in, the top down, and then roll the crepe to enclose the filling.  Place them all in a lightly greased pan and bake them in a preheated 350°F oven for about half an hour or until they are heated through.  Serve them hot topped with the blueberry compote.

Sunday, March 27, 2011

The Daring Bakers make Yeasted Meringue Coffee Cake


The March 2011 Daring Baker’s Challenge was hosted by Ria of Ria’s Collection and Jamie of Life’s a Feast. Ria and Jamie challenged The Daring Bakers to bake a yeasted Meringue Coffee Cake.


Holy cow was this good!  When I realized that I was going to be making this without any extra hungry people around to help me eat it (other than Hey, Babe and Little Man) I decided that I was either going to have to cut the recipe down or make half of it a savory version.  After sitting back and thinking of all the interesting filling possibilities we had in the pantry, I knew that cutting the recipe down was no longer a viable option.


I narrowed down my choices to three.  A savory pizza-like "cake" stuffed with chopped onions, pepperoni, mozzarella and herbs, and two sweet versions.  The first sweet cake had the standard chocolate, cinnamon and nut filling provided in the original recipe and the second had blueberries with a dusting of cardamom. 


I had no trouble getting the dough to come together, the only adaptation to the given recipe that I made was to use 2 yolks instead of one of the whole eggs that were called for to eliminate the waste the meringue would otherwise have created.  I did chose to allow it to rise in the fridge overnight so that I wouldn't have to deal with it the next day, taking it out of the fridge to come to room temperature a few hours before I'd need it (we have a cold house).


When the pepperoni version was baking in the oven my mouth started watering, it smelled so tempting that I could hardly wait to try it.  It was incredibly tender and moist and I said to Hey, Babe that even if the other two version were awful I'd still make this again.  Next time I might add some more cheese, but other than that it was delicious.


After having finished dinner I was curious to see if dessert would be as good.  I tasted the chocolate version and decided it was my favorite.  Then I tasted the blueberry version and decided that it was my favorite.  But when I tasted the chocolate a second time I changed my mind again.  Can you see where this was going?  They were both so delicious I really can't say which I liked more.


This dough was so easy to work with and has so many possibilities for filling variations that I know I will have to try some more versions.  I can see cream cheese, or apples, or sausage and peppers, or broccoli and cheddar, or...I think I need to go eat something.  All those possibilities are making me hungry.


Find the challenge recipe here.

Tuesday, March 1, 2011

Tips To Make An All Butter Pie Dough


Growing up I thought that all pie crusts were gross.  They looked nice (most of the time) and lots were very flaky but sure enough every time I bit into a piece of pie one of two results awaited me.  Either the crust was so dry, bland, and moisture sucking that I'd rather have eaten a stick of chalk, or it left a weird film of something akin to a liquid plastic chemical over the entire surface of my mouth and I'd feel the urge to scrape it off.  Thankfully, Mom agreed that the efforts of making a pie crust weren't worth the unappealing results (and the results of store bought crusts were even worse) and skipped the process entirely, always choosing instead to use graham cracker crusts. 


While in college one of my roommates made a pie for a Thanksgiving dinner we were hosting.  I didn't want to offend her, leaving the crust she had worked hard to make very obviously sitting on my plate with only the filling gone, so I quickly took a bite of the outer crust side.  I had thought to get the gross part over quickly so that my last bites would be nearly all delicious filling, but as I ate that bite I knew it had been a mistake.  It was the best pie crust I had ever tasted.  I don't mean to say that it was just better then all the other gross ones but still not worth eating. No, this crust was incredible.  It was worth savoring.  I should have been taking small bites of the buttery, moist flakes to make it last as long as I could and here I was chomping away trying to get it over with so I could get to the good stuff.  Oddly enough I can't tell you now what kind of pie it even was because the awesome crust pushed all other memories of the experience out of my head.


Now that I knew good pie crust wasn't a myth I knew I was going to have to learn how to make one myself.  After some consultation I was made aware of the standard tips, not to overwork the dough, keep everything cold, use all butter for better flavor use some shortening if you want it flakier (no thanks, that would be the liquid plastic I have always hated), etc.  So I tucked that knowledge away for the next pie crust making opportunity.  Which didn't happen for quite a while.
 

Since that first experience, I have learned a couple of other things.  If you freeze your sticks of butter and then run them over the coarse side of a box grater it will be easy to toss them together with the flour using a fork. Use less water then you think you will need.  Leave dry spots even.  Otherwise you will just add a ton of flour later, toughening up your crust.  I tend to like using my food processor to grate the butter because it is quicker so I also use it for the mixing part, but if you use a hand grater you can mix this with a fork.  Also, who says that you can't flavor the crust?  Recipes don't usually call for any, but I like to add some spices in with the flour that work well with the filling (cinnamon for apple pie readily comes to mind).  Really it seems that good pie crust comes more from practice and a gentle touch then from any specific "best pie crust" recipe, but I have used this one with great success.  One of the benefits of baking is being able to eat your mistakes as you learns from them so get in the kitchen and give it a try. 


All Butter Pie Dough

-= Ingredients =-
2 1/2 cups Flour
2 tablespoons Sugar(for savory applications, reduce this to 1)
1 teaspoon Salt
1/2 tsp ground spice, like cinnamon (optional, use whatever will best complement your filling)
2 sticks unsalted butter, frozen
1/2-34 cup ice cold water

-= Instructions =-
To the bowl of your food processor add the flour, salt, sugar and spice.  Pulse once or twice to mix it up.  Open up the processor and remove about a cup of the dry ingredients.  Using the coarse grating disk, feed the first of your frozen sticks of butter carefully through the tube.  Pour the dry ingredients in.  Feed the second stick through.

Switching back to your s-blade, pulse two or three times and then begin to drizzle 1/2 cup of ICE cold water into the feed tube while pulsing.  The dough will look like it is starting to think about coming together. Maybe.  Dump it out into a bowl (or your counter top) and use your hands to finish mixing and bringing it together.  If you really need it, add another tablespoon of water at a time to the dough, but only just enough to make it barely clump together.  


Divide the dough in half, and place each half on a large piece of plastic wrap.  Use the sides of the plastic wrap to pull in the dough and shape it into a disk.  The thinner the disk is now, the less work you will have to do later, but don't go too crazy. Let the dough chill in the fridge for at least two hours before rolling it out.  This helps the butter to get cold and solid again (we don't want it melting into the flour) and also allows the water we added so stingily to distribute more evenly.

Your dough should keep at least a week in the fridge, and in the freezer longer. This will make enough dough for one double crust pie.

Just a couple of rolling tips: When you are ready to roll out your crust, lightly flour your workspace and leave the plastic on the top of the dough.  Turn the crust often so it doesn't stick to your counter.  Halfway through rolling it out, peel off your plastic wrap since it will have been stretched quite a bit by now and may be at risk of tearing.  You can stick it back on if you like, but removing it will have released the tension that was building up (learned that the hard way, see the below photo).  We don't want it to rip and leave behind bits of plastic.  If you use plastic all the way to the end of your rolling, allowing the dough to chill again will make it easier to remove the plastic without ripping your hard work to shreds.

Sunday, February 27, 2011

Daring Bakers make Panna Cotta and Florentine Cookies

The February 2011 Daring Bakers’ challenge was hosted by Mallory from A Sofa in the Kitchen. She chose to challenge everyone to make Panna Cotta from a Giada De Laurentiis recipe and Nestle Florentine Cookies.


All month I have been putting off making this challenge for the simple reason that I didn't want to be the only one to eat it.  Hey, Babe isn't really big on dessert (so he claims) and insists that he pretty much just sticks to cookies.  Since the deadline for the challenges was very helpfully coinciding with our plans to visit my family, I was pleased to started whipping everything together.  I hadn't anticipated any trouble.  Since it just looked like a soft pudding to me, I thought it would be a cinch to make.


Actually, the Panna Cotta really was simple.  I didn't have any trouble tweaking it to make the coconut version I had visions of.  The trouble came when I tried to create a recipe for chocolate geleé.  You see, my vision included a chocolate geleé layered with creamy coconut Panna Cotta and served with a crispy almond Florentine cookie alongside.  Things didn't quite turn out the way I had planned.  The chocolate geleé never actually set, which I discovered as I was ready to pour my assembled Panna Cotta into the dishes.  On top of that, Hey, Babe became miserably ill with his second stomach virus in a month while I was in the middle of preparations.  It turns out that I won't be having anyone to share my incredible dessert with after all since we did not feel inclined to spread the plague to another household and opted instead to stay home. 


At the last minute I poured my coconut panna cotta into two large bowls and only one of the prepared glasses with the chocolate not-quite-geleé.  Since the one I poured into the glass didn't really layer nicely I feel it was a wise choice.  The chocolate not-really-at-all-geleé-now-that-I-think-about-it I simmered in a pot until it became a much thicker chocolate sauce.  Tasty, but not what I had planned.  The combination between the two was absolutely perfect.  The bitterness of the chocolate subdued the sweetness of the panna cotta and danced together with the coconut in perfect harmony.  It was exactly as I had hoped.  The Florentine cookies added a pleasant crumbly crunch to an otherwise silky smooth experience and all in all I am completely satisfied with the results.  The only shame was the lack of any appreciative audience to share it with.


To the given recipes I made the following changes:
-Substituted 1 can (2 cups) of coconut milk for the 1 cup of milk and 1 of the cups of heavy cream
-Substituted sugar for the honey (I wasn't sure how strong the coconut flavor was going to be and so I didn't want to take any chane that the honey would distract from it)
-Added 2/3 cup of chopped almonds to the cookies
-Substituted almond flour/meal for the all purpose flour (I think it made them quite crumbly but I liked them that way)

Saturday, February 5, 2011

Daring Bakers Make Biscuit Joconde Imprimes, part Two

Our happy plans of celebrating some birthdays with this marvelous dessert over the weekend were shot to pieces when Hey, Babe came home from work with a stomach virus.  I suddenly found myself with an enormous dessert and no one to share it with, though I really can't complain about that part.  It is unfortunate that the change in plans happened so last minute, if the party had been canceled sooner I would have been able to put off making it, make a smaller version, or even try to freeze it right away.  However, that wasn't the case.


I wasn't sure how well the mousse was going to freeze since I've never tried it before.  Some Google searching didn't give me any promising reports for a mousse made with gelatin, noting weeping and separating in some cases.  Not only that, but I had no idea how to package the mousse to protect it in the freezer.  I didn't have a big enough container to fit it in as a whole and I was afraid that anything I could wrap it in would just stick to it and ruin it.  So I just ate the whole thing myself.


I'm kidding! Although I really could have because whoa, it was the best one I've made to date.  I ended up cutting the mousse into pieces and freezing them in smaller containers and when I defrost a piece I will be able to find out how well this particular recipe freezes for future reference.  I had hope that Hey, Babe would recover quickly so I optimistically left a piece out for us to share.  Hey, Babe not recovering fast enough, plus the fact that Little Man also caught the bug, plus the mountains of gross laundry that resulted from all that sent me to the fridge often to console myself.  Needless to say, the unfrozen piece is long gone.  Poor Hey, Babe will have to wait until I defrost another piece before he can try it.


At first I wasn't sure that the caramel layer came through over the strong flavor of the white-mocha layer.  After several taste tests I have decided that it doesn't (and really can't) come through over the mocha layer, but it definitely complements it.  I am pretty sure that this is my new favorite triple mousse cake.  And thanks to some unfortunate luck on Hey, Babe's part, I will get to eat it several more times.  Hmm, I wonder how it tastes frozen?


Triple Layer Mousse
Ingredients:
Milk Chocolate Mousse:
10 oz. Milk Chocolate
1 1/2 c. Heavy Cream
1 tsp. unflavored Gelatin
2 Tb. cool Water

White Chocolate-Mocha Mousse:
10 oz. White Chocolate
1 tsp. unflavored Gelatin (or 2 sheets)
1 1/2 c. Heavy Cream
1 ½ TB. Instant coffee granules

Caramel Mousse:
For the caramel:
1/2 cup sugar
1/4 cup heavy cream
2 teaspoons unsalted butter
1/4 tsp salt
For the mousse base:
1 tsp powdered gelatin
2 tsp cool water
1 egg yolk
1 TB sugar
1/4 cup milk
1/2 tsp. vanilla
1 cup heavy cream


Instructions
For the Milk Chocolate Mousse:
Chop the milk chocolate and place it in a double boiler. Pour ½ c. of the heavy cream over the chocolate and allow the gentle heat of the simmering water below melt the chocolate. Stir the chocolate and cream mixture until smooth.

While the chocolate is melting, pour the 2 TB of cool water into a small dish and sprinkle the gelatin over the top. Let sit until the gelatin has completely dissolved and begins to thicken into a gel. Add the gel and stir it into the milk chocolate mixture until it has completely melted. Allow chocolate mixture to begin cooling so it does not melt the whipped cream you will be adding.

Using your mixer, whip the remaining 1 c. of heavy cream to soft peaks. Check the chocolate, you want it around 80°F or cool but not stiff. Add about half of the whipped cream to the melted chocolate, whisking and folding gently until it is incorporated. Fold in the remaining whipped cream once the first half is whisked in. When the chocolate and cream are evenly blended, pour the mousse into your chosen vessel. I had a layer of the Joconde cut to the size of my Springform pan and placed in the bottom. But this can also be poured over a flourless dark chocolate cake, or into glasses to be served individually. Smooth the top and put in the fridge.


For the White Chocolate-Mocha Mousse:
Wait around 20 minutes after the first mousse was made before you begin to give it a bit of time to set and then proceed in the exact same manner as the first mousse with the exception of adding the coffee granules to the ½ cup of heavy cream before pouring over the white chocolate (unless you prefer to leave the white chocolate mousse plain, in which case omit the coffee). Pour the finished white chocolate mousse over the previous layer and place back in the fridge.

For the Caramel Mousse:
For the caramel:
Place the sugar in a small heavy bottomed saucepan set over high heat. Cook until the sugar has melted and is beginning to turn darker in color. Remove from the heat (the residual heat from the bottom of the pan will continue cooking it until it is a darker color) and add the heavy cream and butter. Stir with a wooden spoon until completely smooth, add the salt and stir a bit more until it is incorporated. Scrape out into a small bowl and set aside.

Prepare the mousse base:
Measure the cool water into a small dish and sprinkle the gelatin over top to soften. Set aside. In the now empty caramel pot, whisk the egg yolk with the sugar until very pale. Add the milk and vanilla and heat slowly over medium heat until it has thickened enough to coat the back of a spoon. Add the softened gelatin and stir until it all dissolves into the cream. Add the waiting caramel back to the pot and whisk well to combine. Let cool to room temperature.

In a medium bowl, whip the heavy cream to soft peaks. Carefully whisk and fold 1/3 of the whipped cream into the caramel base. Continue on and gently fold in the rest of the whipped cream. Pour the finished caramel mousse over the previous layer, smoothing carefully. Allow the assembled layers of mousse to chill in the fridge at least an hour (a few more would be better) before serving.

Thursday, January 27, 2011

Daring Bakers Make Biscuit Joconde Imprimes, part One

The January 2011 Daring Bakers’ challenge was hosted by Astheroshe of the blog accro. She chose to challenge everyone to make a Biscuit Joconde Imprime to wrap around an Entremets dessert.  Now, when that was announced I had absolutely no idea what it was.  All I knew was that it sounded fancy, and complicated, and, well...challenging.  Back to the challenge aspect of the group.  However, since I like desserts I was not in the least concerned about liking it, just about managing to get it completed while corralling two kiddoes.  When I read the challenge further I discovered what we were making and found out that we were suppose to come up with our own fillings.  I knew without a doubt what I was going to be making.


The very first "fancy" dessert that I ever made was a three layer chocolate mousse cake, the recipe for which I got, ironically, from a King Arthur Flour Cookbook.  I say ironic because the original recipe didn't have any flour in it, strange coming from a company that distributes flour.  The bottom was a dark chocolate flourless cake, the middle layer a milk chocolate mousse, and the top was a white chocolate-raspberry mousse.  It is one of the few recipes I have made several times because it has always pleased the crowd. 


I was all set to make and fill my Biscuit Joconde but had no idea what sort of design I was going to attempt to implement.  After a lot of consideration I went with random squiggles, which didn't quite turn out as clearly as I had hoped, but since I didn't end up with a burnt or cracking mess I figured for a first attempt it went well.  Continuing on, I assembled my milk chocolate mousse and poured it into the pan with the jaconde molded around the edge.  Uh oh!  My estimates were way off since the mousse only came to about a third of the way up the side.  I was going to need to come up with another layer. 


After some searching through various saved recipes I decided on adapting one for a caramel mousse.  Throughout the entire process it was this step that gave me the most trouble.  I needed to make a caramel sauce from scratch since I wasn't about to to go out in our very strange lightning blizzard and that was the trouble.  I have attempted caramel once before and while it was edible, it was grainy and a bit bitter/burnt and unfortunately the first batch I made for the mousse came out the same way.  I was not going to ruin a beautiful dessert by using the subpar caramel I had just produced, so I did some quick research and decided to try again.


One of the suggestions for keeping the caramel from burning was to submerge the bottom of the pan into cold water to stop the cooking process.  This sounded plausible and so I did so only to be quite dismayed when my beautiful caramelized sugar seized in the bottom of the pan and turned into rock hard candy.  Not knowing how else to remove the sugary mass from the bottom of my pan, I decided to try and melt it off over a low heat.  Eventually, the mess began to melt back into beautiful caramel and although it was a time consuming process I was able to use it for the middle layer, a delicious caramel mousse.


It wasn't until after I made the caramel mousse that it occurred to me that the caramel mousse and the white chocolate mousse were going to have a similar flavor profile.  Proceeding on with the white chocolate mousse would probably have been fine, but I decided to alter it and turn it into white chocolate-mocha.  Judging from the bits I tasted that were leftover in the bowl, I believe it was an excellent decision.

(see that clump? that is the caramel mess starting to melt again)

The mousse is currently setting in my fridge.  There are as of yet no interior pictures since we will be eating it this weekend as we celebrate two family birthdays.  I still wanted to post today since it is reveal day, and since I already had so much to blabber about I will save the interior pictures to post with the recipe later this weekend or early next week.  I thoroughly enjoyed this challenge and must thank Astheroshe for introducing a new dessert presentation to me.  Be sure to visit some of the other incredible desserts that other Daring Bakers have produced this month.  If you wish to try the recipe for the Joconde, you will find the one we used here on the Daring Kitchen website.
Related Posts Plugin for WordPress, Blogger...