Saturday, November 6, 2010

Amazingly Moist Salmon


Anyone who has glanced at our monthly meal plans may feel safe in assuming that we eat a lot of fish.  After all, it is on the menu at least once a week.  That assumption would be incorrect.  Though it appears regularly on the menu, it appears quite irregularly on our plates.  Hey, Babe doesn't really care for fish, for him seafood is only a vessel for either tartar or cocktail sauce.  He does, however, want us to eat more of it because fish is good for you, and so it is my backup meal. 


I do not typically plan into the menu any potential leftovers, so I know that we are going to have more food than days in the month.  As the kids get older, eat more, and get a bit more predictable in what they will eat, this might change. Or I might just make more food and still have leftovers.  For now, I have two fail-safes in place to make sure that we don't have a fridge full of leftovers going to waste.  One is that I plan on eating leftovers from dinner for my lunch the next day, especially when there is only enough left for one person.  The second is scheduling in fish.  If we do not need to make another meal because of a plethora of leftovers, fish night is what gets skipped.


On Sundays we tend to be out and about, going to church and visiting family, so I have taken to planning salmon salad sandwiches for Sunday's dinner.  Since it is Hey, Babe's only day off, if we are home for lunch or dinner on Sunday I don't want to spend it standing in the kitchen and sandwiches are the quickest thing.  I know that this is the reverse of most people, they plan on big Sunday dinners because they are home to cook.  I would rather take the opportunity for family time and cook more meals during the week.


I was surprised when Hey, Babe told me that he liked this dinner, and even more surprised when he actually finished his entire piece (actions speak louder than words, especially when it comes to fish).  Not because I didn't find it delicious, (I did) but simply because it was fish.  I didn't use Salmon, replacing it instead with milder Tilapia.  Right now we use salmon for sandwiches and Tilapia for the occasional cooked dinner.  Eventually I am hoping that fish will grow on Hey, Babe and we can move on to Salmon.  I prefer it, and I believe it is supposed to be healthier. 


The Cheesy Broccoli and Rice Casserole was something that I threw together at the last minute in an attempt to get Little Man to eat more of his broccoli.  It didn't really work, but since Hey, Babe and I found it to be delicious I will definitely be making it again.  Thankfully I am beginning to develop the habit of noting measurement down when I am experimenting in my cooking.  This makes it much easier to reproduce a recipe I created on the fly, such as this one.  This casserole may undergo further experimentation in the future, perhaps being turned into a full meal in itself with the addition of chopped chicken and then spread into a casserole dish, topped with more cheese and baked in the oven until heated through.  Until then, I can still recommend it as it is, a wonderful and filling side dish.


Amazingly Moist Salmon
Ingredients
3 tablespoons mayonnaise
1 tablespoon Dijon mustard
2 tablespoons chopped fresh parsley
dash powdered thyme
pinch Old Bay Seasoning
4 salmon fillets (or tilapia!)
1/2 teaspoon salt
1/8 teaspoon freshly ground black pepper

Instructions
Preheat the oven to 500F. Coat a baking sheet with cooking spray (important! I forgot this and mine stuck a bit). 

In a small bowl, whisk together the mayonnaise, mustard, parsley and spices.  Sprinkle the salmon with the salt and pepper. Coat each fillet with some of the mayonnaise mixture and set on the baking sheet.  Roast 10 to 12 minutes, until done.


Cheesy Broccoli and Rice Casserole
Ingredients
6 cups water
1 cup brown rice
1 teaspoon salt
1 tablespoon dehydrated minced onions
1 cup half and half
1 cup sharp cheddar, shredded
1/4 teaspoon salt
1/4 teaspoon chili powder
1 bag frozen broccoli florets, defrosted

Instructions
In a large pot, bring the water to a boil and add the rice, salt, and onions.  Continue boiling 30 minutes, uncovered.  Using a fine mesh strainer, drain the water off the rice, allowing rice to stay in strainer for the moment.

In the now empty pot, heat the half and half, cheddar, salt and chili powder over medium heat until cheese is completely melted and mixed in.  Return rice along with broccoli to the pot, stirring until thoroughly combined.  Keep over medium low heat, stirring, until broccoli is heated through.

Friday, November 5, 2010

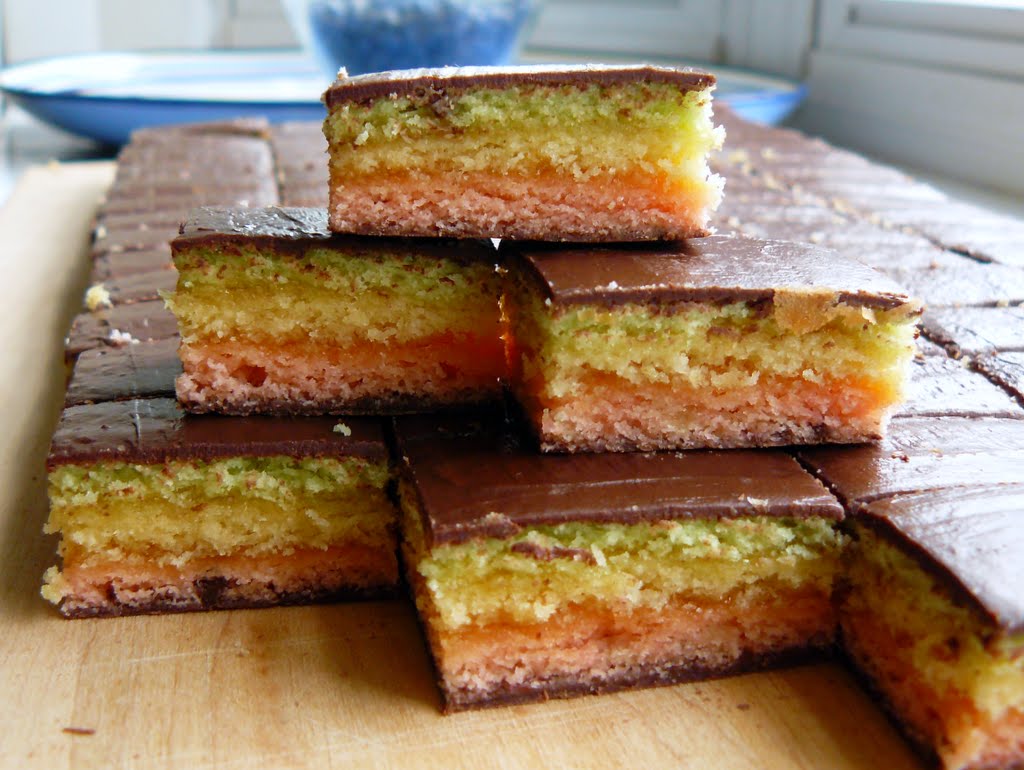
Seven Layer Rainbow Cookies, week 6


The first time I ever had these cookies was at my cousin's bridal shower as a teenager.  A mother of one of the bridesmaids prepared them for the party and I can distinctly remember overhearing the bridesmaid say how difficult they are to make and how her mother only makes them very rarely.  It was several years later before I ever had another one.  The ice cream parlor I worked at tried a sort lived idea of selling baked goods in addition to ice cream.  Of all the things that they sold, these were what I found hardest to resist.  After they stopped selling them I once again went without.


I consider these a very festive, Christmasy cookie, probably because of the colors, and so I find it ironic that I came across them once again because of another bridal shower.  I wasn't about to complain when a co-worker brought a large platter of extra baked goods she had made for her daughter's bridal shower and included on it a ton of these.  Finally, older and wiser, I asked her for the recipe which she (thankfully!) was happy to share. 


Remembering the first bridesmaid's statement that these were hard to make, I expected to find complicated techniques or at the very least days of preparations.  While these are not the most difficult cookie to make, they are involved.  For me the trickiest part comes when you try to spread the batter evenly in the pan.  It doesn't really want to cooperate.  Since it is such a thick batter and you need to spread it out so thin on top of parchment paper, I find it a bit frustrating.  Especially if you misjudged the batter when you were dividing it.  This year I was able to use my kitchen scale to make sure that I divided the batter evenly but if you don't have one, just get it as close as you can.  Some things are just worth the effort.


Seven Layer Rainbow Cookies
Ingredients
1 can (8 oz) almond paste
1 1/2 c (3 sticks) unsalted, softened butter
1 c sugar
4 eggs, separated
1 tsp salt
1 tsp almond flavoring (extract)
2 c flour
Green and Red food coloring
1 jar (12 oz) apricot preserves
2 1/2 squares semi-sweet choc (5 oz) (choc. chips)
Waxed paper

Instructions
Preheat oven to 350°. Grease three 13x9 inch baking pans. Line with parchment paper and grease again. If you only have one pan you will have to reuse it for each layer.

Break almond paste up with fork in large bowl, be sure to break it up small or you will end up with chunks in the batter. Add butter, sugar, egg yolks, salt and almond extract. Beat with electric mixer until light and fluffy. Add flour and blend well.  In a separate bowl, beat egg whites until stiff peaks form. Stir egg whites into batter with wooden spoon using turning motion similar to folding.

Spread 1 ½ c of batter in 1st pan. Remove another 1 ½ c to small bowl and tint with green. Spread evenly in 2nd pan. Add red coloring to remaining batter and spread into 3rd pan (or divide the batter into thirds by weight, I found this to be more accurate).  I tend to go light on the coloring, but these can be as vibrant as you'd like.

Bake in preheated oven for 10 minutes or until edges are golden. Layers will be about ¼ inch thick. Immediately remove cakes from pans to wire racks to cool. I let them cool a bit in the pan then I grab the parchment paper and lift the whole thing out to completely cool.

Heat apricot preserves in small sauce pan and strain half over the green layer being sure to bring to edges. Invert the yellow layer over the green and remove parchment paper. Spread remaining preserves over this layer and then top with red layer in the same manner.

Carefully place the stack in between two of the pans, leaving parchment paper in between the cookies and the pans. Distribute several cans on the top of the topmost pan and refrigerate overnight or at least 8 hours.

After the allotted time has passed, melt chocolate in top of double boiler. Take pan from fridge and remove the top pan and sheet of parchment paper. Spread a thin layer of chocolate on top. Let the chocolate set about ½ hour. Carefully place a baking sheet on top of hardened chocolate and turn over. Now you can put more melted chocolate on this side.

When it is hard, trim the edges of the cake. Cut into rectangles or 1 inch squares. Whatever way you cut it they still taste delicious. Keep them refrigerated.


Jolinda, thank you.  I love these cookies, they are one of my favorites.  I have included them on my Christmas platter every year since you gave me the recipe.  Everyone else, try them out!  Or check out any one of the other goodies we are all baking up for Week 6 of Twelve Weeks of Christmas:

Thursday, November 4, 2010

Chicken and Broccoli with Pasta


Having grown up in a large family with eight kids, going out to eat was something we did extremely rarely.  We hardly did it at all unless it was a very special occasion and even then going out usually meant walking to the local pizzeria and sitting in their dinning room getting fancy pizza (i.e. pizza with toppings other than cheese).  I remember going out to eat one year with my family and grandparents for Mother's Day, and since it happened so long ago there were a lot less of us kids (I think maybe only 5? I'm not sure, less than 8 anyway).


We were all crammed at a long table filled with your standard plates, flatware, napkins and glasses of water, one setting for each of us, as you'd expect.  As the waitress came to get our orders, somehow one of us kids managed to bump their large, full glass of water, spilling it over onto the table.  We all scrambled to fork over napkins, first needing to remove the utensils hidden within, and the waitress hurried off to get dry napkins and a fresh glass of water.  Chaos ensued.


My poor Grandpa and my poor Dad (not to mention the poor waitress).  I can still picture them now.  Both bristling and blustering at the embarrassment, inconvenience, and mess we kids caused as we proceeded to knock over nearly every single glass of water at that table.  My brother Joseph maintains that he did not knock any over, as he was too busy guarding his own glass.  Honestly, I can't recall who started it or even who participated.  I am not even entirely positive of Mom and Grandma's reactions at the time, only their laughter whenever they recounted the tale (especially when it was done in the hearing of my Dad or Grandpa).  Perhaps not going out to eat was less a matter of ability or desire and more a means of self-preservation for my parents.  After this, I don't think we went out to eat again until the oldest of us graduated from High School.


During the years that Hey, Babe and I were dating, we use to often accompany his parents to eat at any one of the typical variety of chain restaurants after church.  Unlike Hey, Babe, I hardly ever order the same thing twice in any given restaurant, preferring instead to experiment and try new things.  This pasta dish is along the lines of something that I first tried while I was out to eat one of those Sundays.  It is a simple Alfredo sauce, served along with broccoli and lightly seasoned, baked chicken.  It isn't very time consuming or difficult.  And if there is any risk of a cascading domino of water glasses in your future, I say skip going out and make this instead.


Chicken and Broccoli with Pasta
Ingredients
3 boneless, skinless chicken breasts sliced in half, horizontally
1 box of your choice of pasta (we almost always use whole wheat pasta)
1 bag of broccoli florets, (not pieces) defrosted
1 1/2 cup of heavy whipping cream
4 cloves of garlic, crushed
3 tbsp unsalted butter
1 tsp dried basil
1/4 tsp dried rosemary
1/2 cup of fresh grated Parmesan cheese (NOT the powdered kind, trust me)
pinch of red chili flakes
salt and pepper to taste

Instructions
Preheat oven to 400°F.  On the chicken fillets, drizzle with oil and season with some salt and pepper. Place them on a baking sheet and put into the preheated oven for about 15 minutes, or until cooked.

Meanwhile, bring a pots of salted water to a boil. Cook the pasta until 2-3 minutes shy of the box instructions for becoming al dente.  Add the defrosted broccoli to the pot for the remaining cooking time.  Once the pasta and broccoli are cooked, remove from heat and strain.  The broccoli should still have a vibrant green color.

While the pasta is cooking, stir the heavy cream in a saucepan over medium-high heat until it begins to thicken. Toss in the garlic, parmesan cheese, basil, rosemary, and chili flakes. Continue to whisk to prevent the cream from burning, and allowing it to thicken.

Remove the chicken from the oven, and cut into quarters. Add most of the sauce to the pasta and mix. Top chicken with reserved sauce and serve with the pasta and broccoli.

Wednesday, November 3, 2010

Post-Election Day

I will never appreciate not getting any channels on our television so much as I do in the weeks leading up to an election.  It seems like those weeks are just one long political advertisement, a hodgepodge of misleading, false, and irrelevant information being spewed from one candidate about the other, and we didn't have to sit through any of it.  I am sure there is a sigh of relief today among people who do watch t.v. on a regular basis, as they can sit down and watch their program of choice in relative peace. 

Last night after dinner we bundled up the kids and brought them with us to our polling location so that Hey, Babe and I could cast our ballots.  Before we left we considered each of us going one at a time so that we wouldn't have to bother with getting the kids into and out of their coats and carseats.  It wasn't a long drive, so each of us going by ourselves wouldn't have been a long drawn out process and would probably have been the easier thing to do, but we decided against it. 

This is the third year I have brought Little Man with me to vote.  The previous years it was due to convenience, we were out and about and it made more sense to stop that moment rather than go later by myself.  The reason we chose this year to go against convenience and bring them with us is because I feel that it is important to vote.  In our country's history, many years and lives were spent ensuring that we would all have the opportunity to voice our opinion about our representatives. 

Too many people exercise their right to laziness, their right to remain ignorant over the issues and candidates, their right to not vote.  It is unfortunate.  Many of those people may argue that none of the candidates were worth voting for, or that it doesn't really make a difference, or that none of the candidates represents them, but the only way for that to change is to do something about it.  Vote in the people whom you feel are most likely to do it right.  If they fail, try again the following year, or run for an office yourself!

Every year until the kids are old enough to chose to stay home, I plan on bringing them with us to vote.  It is a teachable moment in their lives.  Even Little Man at two years old was asking questions about what we were doing, and so we explained it to him in as simple a manner as we could.  We each brought him into the booth with us and allowed him to press the correct selections and help us cast our ballot.  They don't get it now, Little Man still wants to know about the "Boat" we were going to and the Storm Sprite for all she knows never left the house last night since she slept through the entire thing.  As they get older we will be able to show them how we go about selecting the person whom we feel will best represents us.  Eventually they are going to be adults and who need to choose between getting home and relaxing after work or stopping and waiting in line to vote first.  I hope that by bringing them with us we can instill in them the importance of not only voicing their opinion, but making the effort to ensure it is an educated opinion.

Perhaps I am optimistic.  Maybe the people who don't vote are right in saying that the whole system and all of the politicians are corrupt, so voting can't and won't change anything.  But if we don't vote we will never know.  The difference between voting with the hope of making an impact and not voting because you are certain that you can't, is that those who do go out and vote actually have a chance at succeeding in their attempt.  Those that don't vote may never be proven wrong in their supposition, but they are dooming themselves to the same results either way.

Chicken, Corn, and Black Bean Soup


Last month I selected several black bean soup recipes for our meal plan, and this was one of them.  When I think of black beans I always think Tex-Mex because that is that capacity in which I am most familiar with them, but if that is what you are expecting from this soup you will receive a pleasant (I hope) surprise.  This soup is far from that style of black bean.  This is a more more woodsy, herbal, country cottage with a vegetable garden kind of soup.


I keep wanting to call this a vegetable soup because all of the colorful vegetables took up so much of the spotlight that I forget that there even was chicken in it.  To me that means the chicken was superfluous and so next time I will leave it out, turning this into the vegetable soup it is at heart.  I don't typically like vegetable soups but I think the black beans nestle in and fill it out so perfectly that I am tricked into giving this one a pass.  Go ahead and take advantage the soup weather that has come upon us by setting a pot of something delicious to simmer on the stove.


Chicken, Corn, and Black Bean Soup
Ingredients
2 tablespoons vegetable oil
2 medium onions diced
1 green bell pepper ribs and seeds removed, diced
1/2 tsp. dried thyme
coarse salt and ground pepper
2 Tbsp. tomato paste
1 1/2 pounds boneless skinless chicken, chopped bite sized (optional, I'm leaving it out next time)
6 plum tomatoes diced
1/4 cup dry red wine (or Worchestershire Sauce, which is what I used)
1 package (10 ounces) frozen corn kernels
1 can (15 ounces) black beans drained and rinsed
shredded cheddar cheese to serve (optional, but man oh man was it good with it!)

Instructions
Heat oil in a large heavy bottomed pot over medium-high heat. Add onions, bell pepper, thyme, 1 1/2 tsps salt, and 1/4 tsp pepper. Cook, stirring occasionally, until onions begin to brown, 4 to 5 minutes.

Stir in tomato paste; add chicken and saute until it is no longer pink.  Add the chopped tomatoes, wine, and 2 1/2 cups water (feel free to add more wine and less water). Cover and bring simmer, about 15 minutes.

Stir in corn and black beans, and continue to simmer until heated through, about 5 minutes.  Serve on a chilly autumn day.

Tuesday, November 2, 2010

Garlic Bread


You know that incredibly easy bread I told you about yesterday?  One of the many times I made it I turned it into the most delicious garlic bread.  Store bought garlic bread is usually too greasy for me and the flavor falls a bit flat so when I came across this recipe in Cooks Country I jumped to try it.  I've made it before (their way) and have since tweaked it to make it my own.


The first time I made this I froze a portion of it to eat at a later meal.  Hey, Babe and I don't need a whole loaf of garlic bread to ourselves and I was able to use some later straight from the freezer without any prep work.  Another option would be to make extra of the butter mixture and place it in either the fridge or freezer to use on fresh bread later on.  It would take up less room in your freezer but you cut out a bit of time since you only need to slather some on the bread and toast it under the broiler.  Normally this is something I would serve with pasta dishes but it occurs to me that this would be the perfect accompaniment for Minestrone Soup. 


Since the bread does not take long in the oven, toasting the garlic cloves while they are still in their skins helps prevent the garlic from being to sharp and raw.  I use my little blender attachment food processor to mix this together, but if your butter is softened you should be able to mix it up with a fork.


Garlic Bread
Ingredients
9 - 10 cloves garlic, skins left on
1/2 teaspoon salt
1 teaspoon onion powder
1 tablespoon dried parsley flakes
6 tablespoons unsalted butter, softened
2 tablespoons grated Parmesan cheese (I admit that I have so far only used the pre-grated powdered stuff but this is still good.  I can't even imagine how incredible it would be with the fresh grated variety)
1 loaf bread (about 1 pound), halved lengthwise


instructions
1. Preheat oven to 500°F with oven rack in middle position.  Meanwhile, in a small pan placed over medium heat, toast garlic cloves until fragrant, about 8 minutes being sure to shake pan occasionally so they do not burn. Carefully remove skins and place in food processor along with the salt, onion and parsley.  Pulse a few times.  Add the butter and Parmesan and pulse until thoroughly combined.

2. Spread each of the cut sides of the bread evenly with garlic butter mixture. Place the loaves, buttered side up, onto a baking sheet and place in the oven 8 to 10 minutes. Rotate the pan if necessary to ensure that the loaves are browning evenly.  Cut each half into 2-inch slices and serve immediately.

Monday, November 1, 2010

No Knead Bread

I am sure that a lot of you have heard of this bread and have even made it yourselves.  I found this bread on so many different blogs that I finally bookmarked it to eventually try myself.  And then it sat in the recipe box on my computer, gathering dust (can computer files do that?) and basically going to waste.  In the past several weeks I have more than made up for that wasted time.  In three weeks I have made this recipe at least four or five times.  It is so good, so easy to put together, and I love how amazing my house smells when it is in the oven.


I used to have a bread maker sitting on my counter and I used it often in the five years I had it, but never once did I actually use it to make bread.  Every single time I used it, it was to make pizza dough.  The dough setting on that baby was so convenient, especially since I only had a hand mixer and a dinky little attach-to-my-blender food processor (we all know how that changed) neither of those were going to be options and making it entirely by hand wasn't as appealing as pressing a button.  It worked really well until I started needing to make more dough at a time.  The poor little thing couldn't handle it.  This happened right around the time I got my first standing mixer (joy!) and so the forlorn bread machine became as covered in literal dust as the aforementioned recipe.  Dusting is always last on my to-do list and so is never really done often enough, if that bothers you the dust rags are in the hall closet feel free to help yourself!


I eventually let my Mom adopt the neglected bread machine.  She has given it a happy home and from what I hear actually uses it as it is intended, to bake bread (how odd).  I am sure that they will bake many loaves and be happy together (with a household of eight at last count, I'm sure it will be many, many loaves).  I now had more free space on my counter as well as no excuse to keep me from trying this recipe. 


Four ingredients, a bowl, a spoon, and a lid.  That's it.  That's all you need.  Unless you count water as an ingredient, if you do then it's five ingredients.  Me?  I don't count water because I don't have to make sure I have it on hand.  It's always right there in the faucet, which I appreciate.  I love that this recipe can be made ahead.  Days ahead.  Weeks ahead.  That complex dinner you are attempting to make for company next weekend that you wanted to serve some fresh bread with?  Not a problem.  Throw this bread together Wednesday and don't stress out.  It will be there waiting for you, primping and making its flavors even more gorgeous, when you want to pull it out and slap it together into a loaf.  And if you can't wait days for it to be ready, that's not a problem because it is great right away also.  I think I need to go make some more.


No Knead White Bread
Ingredients
3 cups warm water
1 -1/2 tablespoons granulated fast acting yeast (2 packets)
1 -1/2 tablespoons kosher or other coarse salt
1 tablespoon sugar
6 -1/2 cups unsifted unbleached all purpose white flour

Instructions
Add warm water, yeast, and salt to a large bowl.  (I actually use a pot because it has a lid but it doesn't seal completely and you are going to need to cover this but not seal it. They also make special plastic containers to let bread rise in, but that isn't necessary.)  Using a strong wooden spoon give it all a quick stir and then add your sugar and all your flour.  Mix it all together, stopping as soon as you don't have any dry patches.  You aren't kneading this so don't do more work then you have to.

Now cover it, but don't seal it or the extra gases won't escape, and let it rise on the counter at room temperature for about 2 hours or until it collapses or begins to flatten on top.  From this point on you can use the dough, but it is easier to work with if you let it rest in the fridge for around three hours (or up to 14 days!)

Around 45 minutes before you want to bake you loaf, sprinkle the surface of the container of dough with flour.  Pull up and cut off about a 1-pound piece of dough (about the size of a grapefruit) and with flour dusted hands begin stretching the surface of the dough around to the bottom smoothly into your desired shape.  It doesn't matter if the bottom is funny looking, just make sure the top is smooth and place the dough onto a sheet of parchment paper to rise for 40 minutes.

Place a baking stone in the upper middle of your oven with an empty baking pan (NOT glass) on the rack below.  Start preheating your oven and baking stone to 450°F. If you don't have a baking stone, you can use a baking sheet, but you will not get the same crisp crust on the bottom. Get a cup of water ready to pour into the bottom pan, the steam it will create helps give the bread a nice crust.  I forgot to do this once and it was still good so I now consider this an optional step.

When your bread is done rising (it may not look like it rose much, don't worry it will in the oven), dust the loaf with a little flour.  With a very sharp knife or razor, slash the top of the bread to release some of the trapped gas, (which can otherwise deform your bread).  Slide the parchment paper and bread onto the hot baking stone. Quickly pour the water right into the pan underneath the baking stone and close the oven door. Bake for 25-30 minutes. 

Try and let the bread cool before cutting it.  It is very tempting to eat it right away but the texture is better once it has cooled and it is also easier to cut.  If you have leftover bread (unlikely) store it on a plate at room temperature uncovered with the cut side down. 

Keep the unused dough covered lightly in the fridge for up to 14 days.  When your dough is gone, it is recommended that you don't clean the container before mixing the next batch.  The remaining bits of dough will contribute flavor to the next batch, much like a sourdough starter does. (Of course, to go this route I'll need a container devoted to mixing bread, I kind of need my pot occasionally.)

adapted from Artisan Bread in Five Minutes a Day
Related Posts Plugin for WordPress, Blogger...