Wednesday, May 11, 2011

How To Make A Monthly Meal Plan, part 2

If you missed it yesterday, read part 1 here.

In the days before the first monthly trip I had come up with our menu. Our menu is a simple one, listing only the dinners that we will be having since Little Man and I eat leftovers for lunch and breakfast is either cold or hot cereal. After compiling the selections, going through all the recipes, and writing a comprehensive list of ingredients needed, I then checked the list against the contents of our fridge, freezer, and pantry. Various items were adjusted and the list was divided into two parts. After taking stock, I added to my portion of the list any household items that might run out in the next four weeks. We were ready.

While writing out my lists I tried to keep it as organized as possible by grouping like items together. The cold section (Dairy, Meats, and Freezer) I gave to Hey, Babe. It is a shorter list, covering a much smaller portion of the store, but it is nearly as time consuming since you need to check a lot of dates. I took the dry and canned goods as well as the household products. Starting at the farthest aisle first and working my was toward the registers, I got all the things on our list. The cart was very full, and quite heavy. I had strategically placed everything in to make sure it would all fit.

When I was done, I realized that it hadn’t taken me any more time than it normally would have. I still needed to walk down nearly every aisle, but while I was there I was taking several items, or several of the same item, rather than just one. Checkout took a little longer, (understandably so) but even that didn’t take nearly as much time as I had suspected it would. The whole trip (not including traveling, but including loading up the car) had taken about 45 minutes to an hour.

Upon arriving home again we found ourselves faced with the task of storing all the groceries. If it weren’t for our second fridge in the garage, this would have been much trickier. As it is our freezers ended up very full because we had to stow three 1-gallon jugs of milk and four loaves of bread in one (yes, we freeze our milk and bread). Everything else we tucked into place in our cabinets in as organized a fashion as possible and we were then done. For the next four weeks we had everything that we were going to need with the exception of produce.

We have been doing it since. We just shopped for our twentieth month’s plan and while there have been some forgotten items, extra items, nights we didn’t feel like any of the options on the plan, etc. it has made our lives so much easier. At 6 o’clock on any given night we have a fully loaded kitchen, ready to make any number of meals. It even has a convenient list of meal options still available clipped to the fridge.

It has gone so well that once after having written out the menu and corresponding grocery list we arrived at the store to discover we had forgotten the list at home. If we turned around and went home to get it, that meant a 40 minute round trip and losing our window of opportunity for shopping during a low traffic time, so we did our best to get what we thought we needed. We only forgot 5 things (though I think we had some extras of some others).

Are there nights we don’t want to eat the menu? Absolutely. Are there nights I don’t want to cook? Yup. Do we sometimes toss the plan to the side and order takeout? Don’t tell anyone, but yeah. Life happens. Kids interfere with your timetable and it becomes too late to start what had been on the plan, or you forget to defrost the roast that was supposed to be for dinner, or maybe you remembered to pull it out but the darn thing is for some reason still frozen solid. It happens, but because we know that it happens, I try to make sure that there are a couple of easy standbys in every month. Things like breakfast for dinner, or even just holding onto a couple of cans of soup for something quick and hot.

We don’t stick to our menu verbatim. If we are suppose to have Chicken Tacos on Tuesday, but I decide to make Thursday’s Beef Stew instead, it isn’t going to be the end of the world. I do, however, try to stick to the current week but that for the sake of the weekly produce more than anything else. For some families that kind of flexibility might backfire. I don’t have readers (yet) but if my kids were older and looked at the menu to see their favorite Spaghetti with Meatballs as tonight’s dinner they might balk at discovering we are instead having Vegetable Soup and no longer want dinner. It isn’t something I have experienced yet, but it is something to keep in mind for the future. Maybe by then I’ll be better at sticking exactly to the plan, but don’t hold your breath!

Tuesday, May 10, 2011

How To Make a Monthly Meal Plan, part 1

Earlier today I spoke on a panel with three other people at my church's MOPS group.  The subjects presented included juicing and smoothies, couponing, organizing your recipes, and meal planning.  I feel that I was a little scattered in my presentation and am certain I didn't touch on everything I wanted to say.  Since I mentioned that my monthly meal plans could be seen as an example here and some of you lovely ladies I met today might be visiting (Hi!) to get a better idea of what I was talking about, I thought that I would try again. Hopefully more clearly.  First, a little back story:

I am an accomplished list maker. I like writing them, (it helps stall for time so I don’t actually have to cross things off the list). I also like to cook, especially for an appreciative (or sometimes captive) audience. When I was in college and cooking for myself I wasn’t so enthusiastic about cooking because there wasn’t anyone to share it with and I didn’t like the huge mess it made just for myself. After we got married I was the one who was home and available to do the dinner planning and prep so Hey, Babe and I made an agreement that whoever made dinner, the other of us would clean up. Both of my issues with cooking vanished. I started planning out our meals, usually for a week at a time, and doing the shopping once every week or so. I hate shopping (of all the kinds of shopping I’m actually most fond of going for groceries) and so I planned for a week at a time so that I wouldn’t have to go more often than that.

It worked well for a few years, then I got pregnant and two things changed. My sense of smell was such that I could smell our grocery store’s olive bar from the parking lot which made me quite ill and I developed a slew of constantly changing aversions. I didn’t know what I could eat even hours before dinner, let alone days. Hey, Babe started stopping at the store on his way home every night and calling me as he walked up and down the aisles suggesting things. We ate a lot of convenience foods and junk (the opposite of what you really should do when pregnant) and spent at least twice as much (if not more) on our groceries.

It got a little better after I had Little Man. I started planning weekly menus again, selecting meals that were easy to make with only one hand since I had to prep dinner with a baby on my hip. I probably would have stuck with doing the planning and shopping weekly if it weren’t for a few things. One of which had to do with the way I planned our meals. Since Hey, Babe, contrary to his mother’s belief, is not a picky eater and will eat pretty much anything I make, I only had my own tastes to apply to. I would sit with some cookbooks, magazines or websites, and browse for what was appealing. As I browsed through all my recipe sources, I would come up with numerous possibilities which I then had to whittle down to only seven. It wasn’t at all stressful, but it took up a lot of time and as a mother time wasn’t really something I could call my own anymore.

Still, if that were the only factor we would probably still be planning and shopping weekly, and be quite content doing so. The major cause in our change to monthly planning was the simple fact that we moved. The grocery store we liked to frequent was now a half hour ride away. We started shopping at a new and closer store, however, we quickly discovered that we easily spent over $20 more at the new, closer store, than we did at the old one. Now, $20 a week may not be a huge amount of money, but it will quickly add up. On top of that, we could no longer buy certain store-brand items that we preferred if we shopped at the closer store.

After considering the circumstances, we wanted to see if we could go less frequently. Hey, Babe passes a farmer’s market on his way home from work so fresh produce is picked up weekly rather than in the monthly trip. Even without getting any produce, we use two carts. Hey, Babe works Monday through Saturday so we decided to go really early the first Sunday of every month. I knew from experience that we needed to go early enough that we would beat the weekend crowd. At around 7am on that first Sunday morning back in September we headed out, learning that going early meant we wouldn’t just avoid traffic in the store, it also meant that we would have a much shorter ride getting there.

Saturday, April 30, 2011

May Meal Plan

As I was scrolling through my recipe box looking for dinner ideas I was dismayed to find that less than one percent of the recipes in there were wheat-less. Yikes!  Nearly everything was pastas, breads, had breading, etc.  Using less wheat and avoiding processed foods is going to require more thinking outside the box than I had first thought.  We have become such a bread centered society it is hard to avoid it.  There are still some bread-type recipes (like all the pizzas on Mondays, I love pizza) but there are a lot less of them this month than there were for previous months.  Enjoy!

May
Mon. Tues. Wed. Thur. Fri. Sat. Sun.


Zucchini Parmesan
3 Cheese Spinach & Broccoli Pizza Corn Chowder Garlic-Mustard Glazed Chicken Kebobs Swedish Meatballs, Mashed Potatoes Game Night Pan Fried Falafel, Tzatziki, Greek Salad Mother's Day
Spinach & Broccoli Calzones Baked Salmon w/Tomato Mayo BBQ Chicken stuffed in a loaded Baked Sweet Potato Beef Stir Fry w/Snap Peas

Eggplant Balls w/Marinara
Black Beans with Homemade Tortillas

Rosemary Balsamic Chicken over Salad
Sicilian Pizza Sweet Potato & Pecan Burgers with Caramelized Onions Grilled Herb Chicken, Grilled Summer Squash Kefta and Zucchini Kebabs Sausage-Stuffed Potatoes, Spinach Salmon Patties Cranberry Orange Chicken, Rice
Grilled Pizza Cream Cheese & Parmesan Baked Salmon, Baked Potato, Spinach Sweet & Spicy Wings, Sweet Potato Fries Stuffed Cabbage Chinese Barbecued Pork, Fried Rice Anniversary Pollo Rosa Maria, Mashed Parsnips
Memorial Day Cobb Salad


Friday, April 29, 2011

Canned Salmon Burgers


Sometimes when I read the title of a recipe I kind of cringe wondering how in the world someone thought that was a good idea.  And then I look at the accompanying photo and think, "Hmm, actually that doesn't look too bad.  In fact, it looks rather tasty.  Actually, why don't I go see if we have the necessary ingredients, Hey, Babe? Dinner is going off schedule tonight."  This was one of those times.  Except, since we didn't have the ingredients, it got added to the upcoming menu instead of cutting in line.


In our house we eat Salmon Salad Sandwiches the way that most people eat Tuna.  With a little mayo, some spices, and hopefully some finely diced celery and onions all mixed together and spread on a piece of toasted rye or a nice hard roll.  In that application it is delicious, cravable even.  Unfortunately all I could picture was a scoop of that dolloped onto a hot greased skillet and fried into a gooey, gross mess.  Blech!


Upon seeing that the recipe called for a slightly different and much more effective approach than the one in my wild imagination, I decided to see if it was a satisfactory way for Hey, Babe (the fish hater) to enjoy eating a fishy-fish (his opinion) like Salmon.  Does it tell you anything if I mention that he requested it be added to next month's menu?  Delicious! 


Since we aren't eating much wheat at the moment, and the instances we are eating it are reserved for such delicacies as pizza (yum, yum, and yum!), the next time we have these Salmon Patties we will be eating them over a bed of salad instead of rolls.  But these patties?  They will still be delicious, breadless or otherwise.  Enjoy!


Salmon Patties
adapted from Dana
Ingredients
1 (14 3/4 ounce) canned salmon, drained and fluffed with a fork
1/4 cup onion, minced
1/4 cup parsley, minced
2 garlic cloves, crushed/minced
1/4 cup cornmeal
1/4 cup flour (next time I'm trying Parmesan here, I'll let you know how it goes!)
1 egg, beaten
2 Tablespoons mayonnaise
1 tsp lemon juice

dash salt
dash pepper
dash Tabasco Sauce
Oil for frying

Instructions
To a medium bowl add all the ingredients and mix to combine well.  Divide the mixture into four even portions and then use your hands to press each portion into an even patty, around 1/2 - 1 inch thick.

Heat a heavy skillet over medium high and add some oil to coat the bottom of the pan (1-2 tablespoons).  When the pan and oil are hot, fry the Salmon Patties until they are golden on each side.

Thursday, April 28, 2011

Salisbury Steak and Potatoes


Growing up, every once in a while we would be allowed to have tv dinners as a special treat.  There was something special about getting to pick your own entree without a concern for who else liked it, and to have your own personal tray of perfectly portioned out dinner and your own dessert too. None of which you had to share! 


Most often the way I chose which dinner I wanted was based on the dessert included.  I remember wanting to go with Mom to the store to pick out my dinner instead of just placing my order, so to speak.  That way I could see what was available and make sure I got a good combination.  Cell phones would have come in quite useful at the time, I'm sure.


Unfortunately, sometimes the dessert I wanted was accompanying a meal I didn't.  When that happened I still got the dessert it just meant I had to eat something gross first, Salisbury Steak for example.  I never really cared for it, and since the only time I had tasted it was in a prepackaged dinner that isn't very surprising.  What is surprising is that when I saw a recipe for Salisbury Steak, I got a weird nostalgic craving for it, a food I'd never liked. 


After reading the recipe and seeing all that Salisbury Steak could have been I was tempted to try it, and eventually gave in.  The tender and moist beefy patties weren't spongy like a remembered.  The rich and hearty mushroom sauce wasn't nearly as salty and was missing a distinct chemical aftertaste.  In other words, it was delicious and beyond surpassed my childhood memories.  Enjoy!


Salisbury Steak
Ingredients
1/2 cup milk
1/2 cup instant potato flakes (not granules or buds, they won't work here)
1 pound lean ground beef
1/2 teaspoon salt
1/2 teaspoon pepper
4 tablespoons butter/oil
1 large onion halved and sliced thin
1 pound white mushrooms sliced thin
1/2 tsp salt
2 tablespoon tomato paste
2 tablespoons all-purpose flour
2 cups beef broth

Instructions
In a large bowl combine the milk and potato flakes.  Add the beef, salt and pepper and using your hands mix it until it is thoroughly combined (you don't want pockets of mashed potatoes!).  Shape into 6 patties, about 1/2-inch-thick each.  Refrigerate for 1-4 hours to allow them to set up a bit..

In a large skillet set over medium high, heat 1 TB oil and cook the patties 5 minutes or so per side until they are well browned.  Remove the patties from the pan to a plate.  To the empty pan add the remaining oil and cook the onions for 5 minutes until they are soft.  Add mushrooms and salt and cook until their liquid is gone, about 6 minutes.

Mix in the tomato paste and flour and cook, stirring, about 2 minutes.  Stir in the broth and bring to a simmer before returning the patties to the pan.  Reduce heat to medium low and cover, cooking the patties for 12 minutes or so until they are cooked through.  Season to taste with more salt and pepper if needed.

Wednesday, April 27, 2011

Daring Bakers Make Mousse in an Edible Container

The April 2011 Daring Bakers’ challenge was hosted by Evelyne of the blog Cheap Ethnic Eatz. Evelyne chose to challenge everyone to make a maple mousse in an edible container. Prizes are being awarded to the most creative edible container and filling, so vote on your favorite from April 27th to May 27th at http://thedaringkitchen.com!


So, can I tell you a secret?  I'm not writing this at the last minute.  It always seems that real life craziness gets in the way of my ability to complete the Daring Challenges until the very last minute (like the day it is due to be posted) and then I find myself up late after the kids are in bed trying to get the post finished.  Not this time!  I have more than a week to go before this post will publish.  It feels kind of...strange actually.  But I think I like it.


When I first read this challenge, I only skimmed over it assuming that it was the same as the Daring Cooks edible container challenge, except sweet instead of savory.  I missed one key detail in reading the instructions where it said, "There are 2 mandatory components to this challenge. You must make one of the 2 maple mousse recipes listed below and you must make an edible container in which to place your mousse for presentation."  They even put them in bold.  Somehow I thought I could make any filling and it wasn't until the other day that I realized I was suppose to make a maple mousse.


When I realized the filling had already been selected for me I didn't really mind, but I wasn't able to get back to the store to get the real maple syrup that was required.  Not seeing any time in the near future that would be convenient to pick some up and wanting to get started filling the bowls I had already made, I decided to go with Honey, which had been presented as an alternative.  The dried pineapple bowls were inspired by the dried pineapple flowers on Martha Stewart's site, which I saw quite some time ago.  Her recipe says you only need to dry them for around an hour which I found not nearly sufficient.  Perhaps if you can manage to get your pineapple slices paper thin that will be fine, otherwise expect to check it every half hour or so until it is nice and dry and tacky. 


I'm wondering if it would have helped to dried them flat for the first half hour or so before trying to flip them over and place them in my silicone muffin cups.  Trying to fit the stiff, fresh pieces of pineapple was a little tricky because they wanted to tear and break but I noticed when I was checking on them that they had become much more pliable after a little time in the oven.  Be sure that you dry your pineapple on some parchment paper, or a silpat, or something else that it won't stick to otherwise you will end up rather aggravated later.  The muffin cups I used were a gift from one of my brothers (hmm, I seem to get a lot of cooking paraphernalia from those guys) and I don't get to use them often but they worked marvelously for this.  I might make some individual sized fruit leathers in them soon.


Here I am rambling on and I haven't yet told you how wonderful the pineapple and honey went together!  The mousse on it's own was incredibly sweet and I can't really see myself eating much of it that way.  After I paired it with the dried pineapple I was surprised how much less sweet it seemed.  Even though pineapples are a sweet fruit the acidity from the citrus really seemed to mute the sweetness of the mousse.  The pineapple cups were a little chewy and I loved that next to the melting smoothness of the mousse. 


Don't forget that this month's challenge is a competition!  Browse around and see what some other creative souls from the Daring Bakers have come up with and make sure that you vote for your favorite from April 27th to May 27th at http://thedaringkitchen.com!  And if you'd like to try it, find the challenge recipe here!

Saturday, April 23, 2011

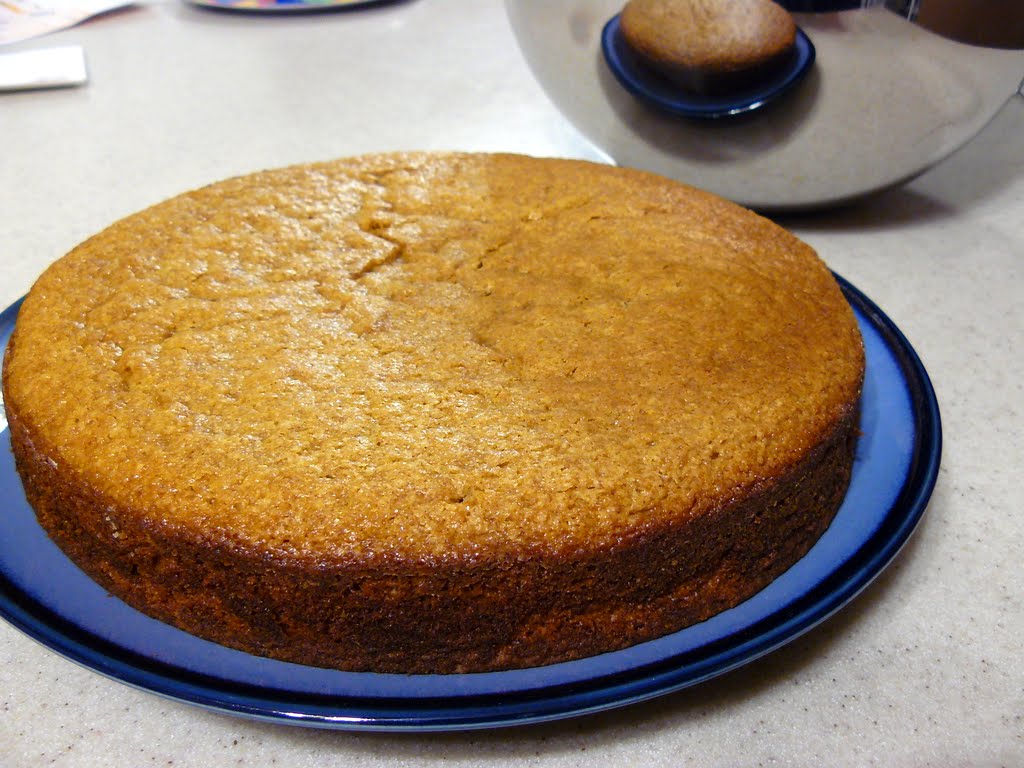
Coffee Cake (not Coffeecake) With Chocolate Icing


For Hey, Babe's birthday we were planning on having a party with his family that, due to various illnesses that bounced between households, never actually happened.  Because of that, I am really glad that I decided last minute on his actual birthday to whip together a cake for an intimate family celebration after dinner.  Plus, even though Hey, Babe isn't a dessert person I know that Little Man was looking forward to singing to Daddy and eating some CAKE!


When I was scanning through some recipes I knew I didn't have a lot of time, which meant that the recipe had to be very simple.  It also couldn't be a chocolate or a vanilla cake since I already had two layers of chocolate cake in the freezer for the coming weekend party and he doesn't care for vanilla.  After flipping through some books I decided to Frankenstein a few recipes and came up with this one.  I  used the recipe for Boiled Milk Frosting that you can find here, choosing to make the chocolate version (add 1/4 cup cocoa powder) that was given as an alternate option.


The cake came together quickly and easily.  It was a very tasty cake, and had it not been for the added icing it would have been a very simple, every day sort of snack cake.  It isn't often that I have a coffee flavored cake and for that reason alone I'd have made it again, but for a cake that was cobbled together from several recipes (mostly Dorie Greenspans Cinnamon Squares) I was quite pleased with how it turned out.

Quick Coffee Cake
Ingredients
1 3/4 cups Flour
1 cup Sugar
2 teaspoons Baking Powder
1/4 teaspoon Salt
3/4 cup Whole Milk
1 tablespoon Instant Coffee Granules
2 Eggs
1/2 teaspoon Vanilla Extract
10 tablespoons Butter, melted and cooled
1 recipe Boiled Milk Frosting (your choice of flavor) optional

Instructions
Preheat the oven to 350°F and grease and flour either an 8-inch square or 9-inch round cake pan.

In a large bowl combine the flour, sugar, baking powder, and salt.  In a large Pyrex measuring cup measure out 3/4 cup of milk and add 1 tablespoon (or more if you'd like it a bit stronger flavored) of coffee granules.  Stir to dissolve.  Whisk in the eggs and vanilla.

Working quickly but gently, stir the wet ingredients into the dry ingredients just until they are combined.  Use a spatula to carefully fold in the cooled melted butter until you have a smooth batter.

Pour batter into prepared pan and bake 35 minutes or so until a knife or toothpick inserted in the center comes out clean.  Allow to cool at least 10-15 minutes before removing from pan.  If you plan on icing it be sure to cool the cake completely first.  Enjoy!
Related Posts Plugin for WordPress, Blogger...