The first time I ever had these cookies was at my cousin's bridal shower as a teenager. A mother of one of the bridesmaids prepared them for the party and I can distinctly remember overhearing the bridesmaid say how difficult they are to make and how her mother only makes them very rarely. It was several years later before I ever had another one. The ice cream parlor I worked at tried a sort lived idea of selling baked goods in addition to ice cream. Of all the things that they sold, these were what I found hardest to resist. After they stopped selling them I once again went without.

I consider these a very festive, Christmasy cookie, probably because of the colors, and so I find it ironic that I came across them once again because of another bridal shower. I wasn't about to complain when a co-worker brought a large platter of extra baked goods she had made for her daughter's bridal shower and included on it a ton of these. Finally, older and wiser, I asked her for the recipe which she (thankfully!) was happy to share.


Remembering the first bridesmaid's statement that these were hard to make, I expected to find complicated techniques or at the very least days of preparations. While these are not the most difficult cookie to make, they are involved. For me the trickiest part comes when you try to spread the batter evenly in the pan. It doesn't really want to cooperate. Since it is such a thick batter and you need to spread it out so thin on top of parchment paper, I find it a bit frustrating. Especially if you misjudged the batter when you were dividing it. This year I was able to use my kitchen scale to make sure that I divided the batter evenly but if you don't have one, just get it as close as you can. Some things are just worth the effort.

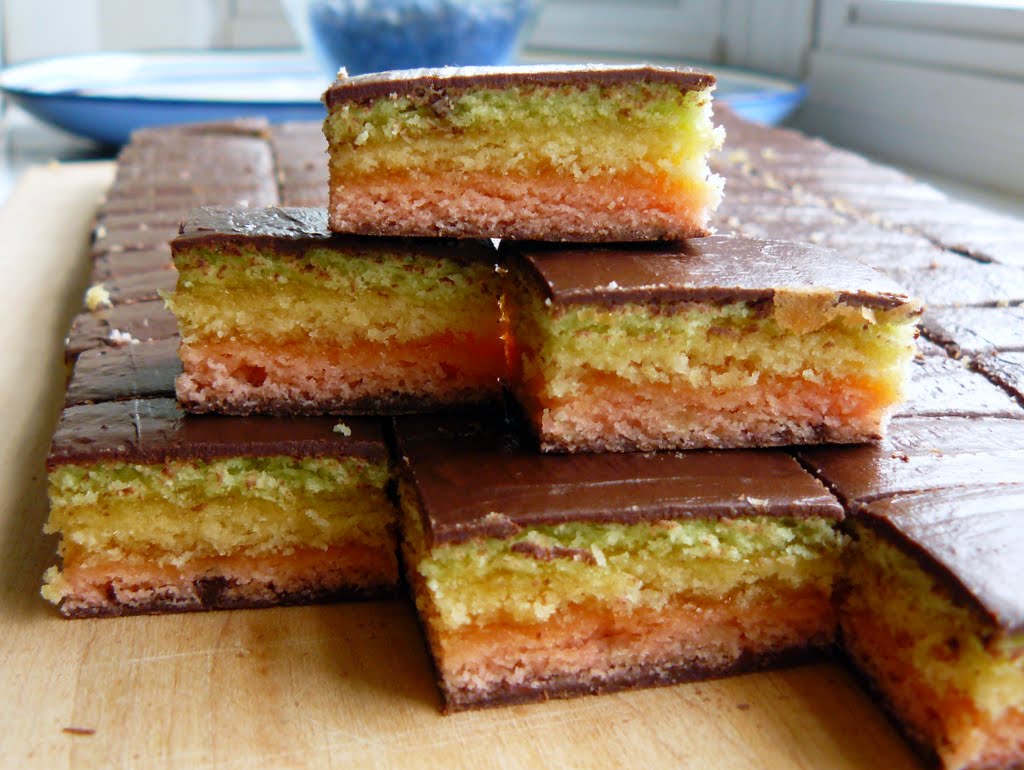
Seven Layer Rainbow Cookies
Ingredients
1 can (8 oz) almond paste1 1/2 c (3 sticks) unsalted, softened butter
1 c sugar
4 eggs, separated
1 tsp salt
1 tsp almond flavoring (extract)
2 c flour
Green and Red food coloring
1 jar (12 oz) apricot preserves
2 1/2 squares semi-sweet choc (5 oz) (choc. chips)
Waxed paper
Instructions
Preheat oven to 350°. Grease three 13x9 inch baking pans. Line with parchment paper and grease again. If you only have one pan you will have to reuse it for each layer.
Break almond paste up with fork in large bowl, be sure to break it up small or you will end up with chunks in the batter. Add butter, sugar, egg yolks, salt and almond extract. Beat with electric mixer until light and fluffy. Add flour and blend well. In a separate bowl, beat egg whites until stiff peaks form. Stir egg whites into batter with wooden spoon using turning motion similar to folding.
Spread 1 ½ c of batter in 1st pan. Remove another 1 ½ c to small bowl and tint with green. Spread evenly in 2nd pan. Add red coloring to remaining batter and spread into 3rd pan (or divide the batter into thirds by weight, I found this to be more accurate). I tend to go light on the coloring, but these can be as vibrant as you'd like.
Bake in preheated oven for 10 minutes or until edges are golden. Layers will be about ¼ inch thick. Immediately remove cakes from pans to wire racks to cool. I let them cool a bit in the pan then I grab the parchment paper and lift the whole thing out to completely cool.
Heat apricot preserves in small sauce pan and strain half over the green layer being sure to bring to edges. Invert the yellow layer over the green and remove parchment paper. Spread remaining preserves over this layer and then top with red layer in the same manner.
Carefully place the stack in between two of the pans, leaving parchment paper in between the cookies and the pans. Distribute several cans on the top of the topmost pan and refrigerate overnight or at least 8 hours.
After the allotted time has passed, melt chocolate in top of double boiler. Take pan from fridge and remove the top pan and sheet of parchment paper. Spread a thin layer of chocolate on top. Let the chocolate set about ½ hour. Carefully place a baking sheet on top of hardened chocolate and turn over. Now you can put more melted chocolate on this side.
When it is hard, trim the edges of the cake. Cut into rectangles or 1 inch squares. Whatever way you cut it they still taste delicious. Keep them refrigerated.

Jolinda, thank you. I love these cookies, they are one of my favorites. I have included them on my Christmas platter every year since you gave me the recipe. Everyone else, try them out! Or check out any one of the other goodies we are all baking up for Week 6 of Twelve Weeks of Christmas:
So pretty! I always heard how hard these are too, but you might have just convinced me to give them a go!
ReplyDeleteThose are beautiful!
ReplyDeleteThese are so pretty!
ReplyDeleteI've always wanted to make these, but haven't. Thanks for the reminder! They look great!
ReplyDeleteThese look amazing! I've never seen these before. I've been missing out!!!
ReplyDeleteI almost made these this week but I chickened out! Glad to see you made 'em! They look great!
ReplyDeleteThese are beautiful! Love the almond flavor, too.
ReplyDeleteI made those one Christmas and yeah, they are tough the first time around. But they are so pretty and so delicious, I may have to try them again.
ReplyDeleteVery impressive and beautiful! I'm sure their taste is wonderful too!
ReplyDeleteThese are beautiful! Bookmarking these!
ReplyDeleteThe frozen cookie dough idea is perfect! I'm doing it this weekend! Thanks... anymore tips you have? I'm all ears. :-)
ReplyDeleteThese are so neat!
ReplyDeleteYour cookies look so perfect. What lovely colors and great flavor too.
ReplyDeleteI've never seen them and they are simply a gorgeous cookie You did a beautiful job with them.
ReplyDeleteMaggie
http://ceodraiocht.wordpress.com
These are so pwettyyyy!
ReplyDeleteThese look awesome and so tasty!
ReplyDeleteI have never seen this coolie and I'm intrigued. Bookmarked!!!
ReplyDeleteGorgeous! I am seriously VERY impressed!!! Totally want to try my hand at making these treasures! AND I just love all the almond taste that is included in the recipe.:-)
ReplyDeleteThese are absolutely gorgeous! I am definately making these for Christmas! Thanks for sharing! Thanks for the comment on my post! Glace` cherries are what I think you call "candied cherries"!
ReplyDeleteThanks everyone, these really are one of my favorites so it surprised me that several of you had never seen them before. I don't think they are going to make it until Christmas.
ReplyDeleteLee Ann- maybe I'll have to start posting random kitchen tips. The only problem with that is that they only come to me sporadically, and I can't think of anything useful offhand. lol, sorry! I'll try to think of something :-)
Marcellina- I'll have to look for candied cherries so that I can try those cookies :-)
ReplyDeleteI love it! And didn't look that dificult! It'll be perfect at the Christmas Cookis Tray!
ReplyDeleteThe colors are divine :) Beautiful cookies. Mine always turn out pale and colorless (probably I don't use enough food coloring). It really does look like rainbow :)
ReplyDelete